
If you’re raising backyard chickens, you’ve probably wondered how to maximize nutrition from your feed budget while keeping your birds healthier and more productive. Fermenting chicken feed is a simple, low-cost practice that transforms ordinary grain into a probiotic powerhouse. Backyard chicken keepers report fewer health issues, better egg production, shinier plumage, and noticeably reduced pecking behavior when they switch to fermented feed. Best of all, it requires no special equipment or complicated steps.
How to Ferment Chicken Feed: The Complete Process
Fermented feed works by harnessing natural beneficial bacteria and fungi already present in the grains. This process breaks down nutrients, making them more bioavailable to your birds’ digestive systems. Here’s everything you need to know to get started.
What You Will Need
- Chicken feed (any complete layer or grower feed works)
- Clean water (unchlorinated or dechlorinated preferred)
- A food-grade container with drainage capability
- A cloth or coffee filter to cover the container opening
- A wooden spoon or stick for stirring
- A warm location (60-75°F is ideal)
Fermentation Process
Choose Your Container and Prepare It
Select a food-grade container with a drain hole near the bottom, or create one by drilling through plastic. This allows excess liquid to drain while keeping the feed moist. Rinse thoroughly with clean water and let it air dry completely before use. A 5-gallon container works well for a small flock of 5-8 birds.
Fill with Feed and Water
Add feed to your container until it’s about three-quarters full. Pour in clean water until the feed is submerged by roughly 2 inches. The water-to-feed ratio should be about 2:1. Stir thoroughly to break up clumps and ensure all feed comes into contact with water.
Cover and Let It Sit
Drape a cloth or coffee filter over the opening to allow airflow while preventing debris and insects from contaminating the feed. Secure it loosely with a rubber band. Place the container in a warm, shaded location away from direct sunlight. The fermentation process begins immediately.
Monitor Daily and Stir
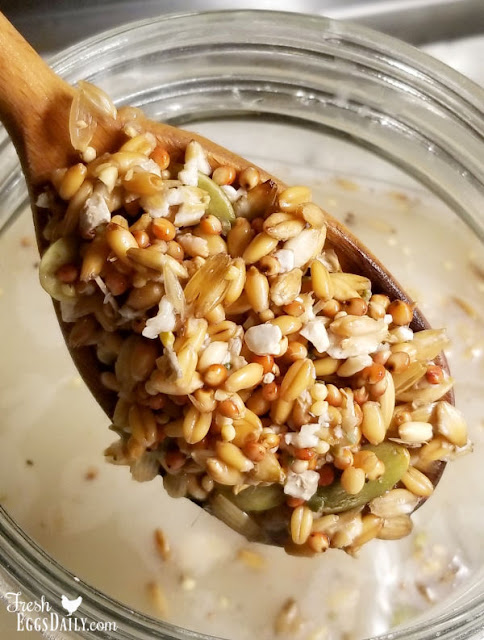
Each morning and evening, stir the mixture thoroughly. You’ll notice bubbles forming, a sour smell developing, and possibly some white or grayish mold appearing on the surface within 24-48 hours. This is exactly what you want. The smell should be pleasantly sour like sauerkraut or sourdough, not rotten. Some cloudiness in the liquid is normal.
Watch for the Fermentation Signals
By day 3-4, you should see active bubbling, a distinctly sour aroma, and a cloudy appearance to the liquid. The feed grains will have softened and may have expanded slightly. Taste a tiny bit if you’re comfortable doing so; it should be tangy and pleasantly sour. If you see fuzzy black or pink mold, something went wrong and you should start over.
Drain Excess Liquid Daily
Once fermentation is active (day 3+), drain the liquid through your drain hole or carefully pour it off. You can feed this nutrient-rich liquid to your birds separately, use it on garden plants, or compost it. Draining prevents excessive moisture that could promote harmful mold growth.
Feed to Your Chickens
Once fermented (typically day 5-7), feed the mixture to your birds in small amounts, starting with a quarter of their normal feed ration. Their digestive systems need time to adapt to the probiotics. Gradually increase over 2-3 weeks until fermented feed becomes 25-50% of their total feed intake.
Maintain a Continuous Batch
Once you’ve harvested some fermented feed, you can simply add fresh feed and water to your container and let the existing beneficial bacteria culture ferment the new batch faster, usually in just 2-3 days. This ‘mother culture’ method keeps you in fresh fermented feed year-round with minimal effort.
- Use unchlorinated water if possible, as chlorine can inhibit fermentation. Let tap water sit overnight before use, or collect rainwater from clean gutters.
- If your ferment smells like ammonia or rotten eggs rather than pleasant sauerkraut, discard it and start fresh. Temperature control is key; fermentation slows significantly below 60°F.
- Feed fermented grain wet as-is for maximum probiotic benefits, but you can also spread it on a screen to partially dry it if your birds prefer less wet feed.
What to Look For in Fermentation Containers
- Food-Grade Material: The container must be made from food-safe plastic or glass with no BPA or harmful chemicals. Avoid containers that previously held pesticides, chemicals, or non-food items.
- Drain Capability: A spigot or drain hole near the bottom allows you to remove excess liquid without disturbing the fermentation. This prevents bacterial overgrowth while maintaining proper moisture levels.
- Size for Your Flock: A 5-gallon container works for 5-8 birds, while 10+ gallon containers suit larger flocks. Ensure you have adequate space for proper water coverage and fermentation.
- Opaque Design: Light-blocking containers protect the fermentation process by preventing light exposure, which can degrade nutrients and interfere with beneficial microorganism activity.
5 Gallon Food Grade Bucket with Spigot by Impact Products
Best for: Small to medium chicken flocks
This durable food-grade plastic bucket features a convenient spigot near the base for easy liquid drainage, eliminating the need to drill holes or pour off excess fermentation liquid. The 5-gallon capacity suits flocks of 5-10 birds perfectly, and the opaque white plastic blocks light while remaining cleanable and long-lasting. The secure lid keeps pests out between fermentations.
Check Current Price on Amazon →Rubbermaid Roughneck Clear 14-Gallon Storage Container
Best for: Budget-conscious chicken keepers
An affordable clear plastic storage container that works well for fermentation with minimal investment. While you’ll need to drill a drain hole yourself, the large 14-gallon capacity handles bigger flocks efficiently. The durable plastic resists cracking, and the snap-tight lid keeps contaminants out. Many keepers use this as their primary fermentation vessel.
Check Current Price on Amazon →Gamma Seal Lid Conversion Kit with 5-Gallon Bucket
Best for: First-time fermenters wanting ease of use
This kit transforms a standard 5-gallon bucket into a professional fermentation vessel with its easy-screw gamma seal lid system. The combo bucket and lid setup makes sealing, opening, and monitoring your ferment simple without complicated drilling. Perfect for beginners who want foolproof storage and reliable sealing.
Check Current Price on Amazon →Fermentation Crock by Mortier Pilon
Best for: Serious homesteaders wanting traditional quality
A beautiful ceramic fermentation crock designed specifically for lacto-fermentation with an integrated water seal and weighted lid system. While more expensive than plastic alternatives, the food-grade ceramic maintains proper fermentation conditions, won’t absorb odors, and lasts indefinitely. Ideal for chicken keepers who also ferment vegetables.
Check Current Price on Amazon →Start Fermenting Today for Healthier, More Productive Chickens
Fermenting chicken feed is one of the simplest yet most impactful improvements you can make to your flock’s health and productivity. The process requires no special skills, costs just pennies per batch, and delivers measurable results within weeks. Your birds will enjoy improved digestion, shinier feathers, better egg production, and reduced behavioral issues. Most importantly, you’ll gain the satisfaction of optimizing your chickens’ nutrition through a time-honored fermentation technique.
The investment in a proper food-grade container with drainage capability is minimal and pays dividends through years of use. Whether you choose a simple 5-gallon bucket with a spigot or invest in a beautiful ceramic crock, you’re making a choice that honors both your birds’ health and your commitment to sustainable, resourceful homesteading. Start small with a single batch this week, and within a month you’ll be managing continuous fermentation that keeps your flock thriving year-round.
Frequently Asked Questions
How long does fermented feed stay good?
Fermented feed remains viable for several weeks if kept in cool conditions with proper drainage. Once you stop draining excess liquid, use the batch within 7-10 days to prevent harmful mold. Maintain your ‘mother culture’ by continuously adding fresh feed and water to your container.
Can I ferment any type of chicken feed?
Yes, any complete chicken feed (layer, grower, starter, or scratch grains) ferments successfully. Whole grains ferment slower than crumbles; whole corn can take 10+ days. Mix different feed types for faster, more reliable fermentation with diverse beneficial bacteria.
Will fermented feed attract rats or pests?
A properly covered container with drainage prevents pest access. The sour smell actually deters some pests, but keep your fermentation container elevated and secure. Never leave fermented feed sitting in an open trough overnight; feed only what your birds consume in a few hours.
What if white fuzz appears on my ferment?
White mold (likely beneficial) is normal during fermentation and safe to feed. Black, pink, or orange fuzzy mold indicates contamination; discard the batch and start fresh. A sour smell should always accompany white mold; any off odors mean you should restart.
How much should I feed fermented grain daily?
Start with 10-15% of their normal feed ration and gradually increase over 2-3 weeks to 25-50% of total intake. Fermented feed is nutrient-dense, so you can reduce overall feed volume slightly while maintaining nutrition. Monitor your birds’ weight and egg production to find the right balance.
As an Amazon Associate, Build & Bloom earns from qualifying purchases. We only recommend products we genuinely think are useful. Prices and availability vary; check Amazon for the latest.
Leave a Reply