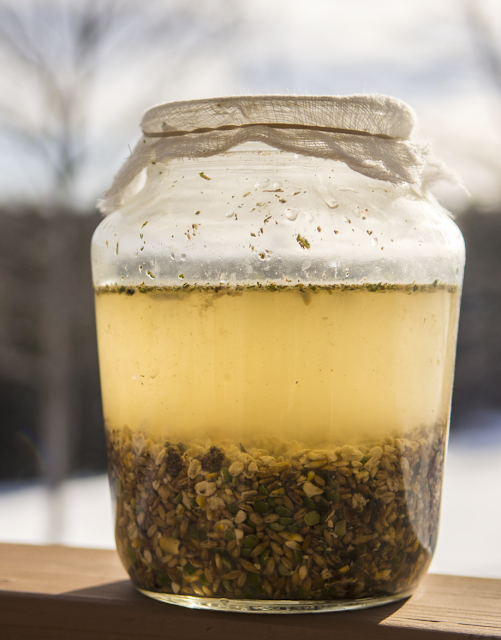

Fermented chicken feed is one of the most transformative upgrades you can make for your backyard flock’s health, yet many homesteaders skip it because they think the process is complicated or mysterious. The truth? Fermentation is simply controlled decomposition, and making it work for your chickens requires only basic materials and consistent daily attention. When done right, fermented feed boosts digestive health, increases nutrient bioavailability, reduces feed waste, and can save you money long-term while your birds thrive.
How to Ferment Chicken Feed in 8 Steps
Fermentation happens naturally when grains are submerged in water and exposed to beneficial bacteria. Follow this straightforward process to create a nutrient-rich supplement your flock will love.
What You Will Need
- A food-grade container (5-gallon bucket, glass jar, or ceramic crock) with loose lid
- Chicken feed or mixed grains (layer crumbles, scratch grains, or whole grains)
- Dechlorinated water (filtered or left sitting 24 hours)
- A stirring utensil (wooden spoon or long stick)
- A strainer or colander for serving
- A cool, dark location out of direct sunlight
Steps
Choose Your Grains
Select feed appropriate for your flock’s age and needs. Layer feed for laying hens, grower feed for pullets, or a mixed grain blend works well. Avoid medicated feed, which can inhibit fermentation. You can also mix different grains together for variety.
Fill Your Container
Add grain to your container until it’s roughly one-third full. The exact amount depends on your flock size, but start with 5-10 pounds if using a 5-gallon bucket. Leave plenty of headspace for the fermentation process to expand and bubble up.
Add Dechlorinated Water
Pour water over the grain until it’s completely submerged and covered by an inch of liquid. Chlorine can inhibit fermentation, so use filtered water or tap water that’s been sitting uncovered for 24 hours. The water-to-grain ratio is flexible; aim for a thick porridge consistency.
Set Up Your Location
Place the container in a cool, dark spot like a basement, garage, pantry, or shaded corner of a coop. Temperatures between 60-75°F are ideal. Avoid direct sunlight, which can create unwanted algae growth. Ensure the location is accessible for daily stirring.
Stir Daily for One Week
Every morning or evening, stir the mixture thoroughly for about 30 seconds with a clean utensil. This introduces oxygen and ensures even fermentation. You’ll notice the mixture becoming cloudier and developing a pleasant, yeasty aroma by day 2-3.
Watch for Bubbling and Aroma
Active fermentation produces visible bubbles rising through the mixture and a distinctive sour or slightly vinegary smell. This is exactly what you want. If you see mold (fuzzy growth on the surface), the batch has contaminated and should be discarded.
Test for Readiness
Fermentation is complete when bubbling slows and the grains taste slightly sour. This typically takes 3-7 days depending on temperature. Warmer conditions ferment faster; cooler conditions take longer. You can use it anytime after day 3 if you prefer a milder ferment.
Drain and Feed Your Flock
Use a strainer to drain excess liquid (which you can compost or water plants with). Offer the fermented grains to your chickens in a shallow feeder, starting with small amounts mixed into their regular feed. Gradually increase to 10-20% of their daily ration over a week.
- Make a continuous batch by adding fresh grain and water to the same container every 3-4 days, creating an ongoing supply without starting from scratch each time.
- Save the drained fermentation liquid (called ‘whey’) to use as your water base for the next batch, which speeds up fermentation significantly.
- Ferment multiple containers on a staggered schedule so you always have fresh feed ready while others are fermenting, ensuring your flock gets consistent access.
What to Look For in Fermentation Containers
- Food-Grade Material: The container must be food-safe to prevent chemical leaching into your ferment. Glass, ceramic, and high-quality plastic buckets marked ‘food-grade’ are all suitable choices.
- Capacity Relative to Flock Size: A 5-gallon container serves 10-15 chickens well. Larger flocks benefit from 10-gallon or bigger containers, or multiple smaller batches running simultaneously.
- Loose-Fitting Lid: The lid should rest loosely on top rather than seal tightly. This allows gases from fermentation to escape while preventing dust and debris from entering the container.
- Opacity and Durability: Opaque containers prevent light from degrading the ferment. Choose sturdy options that won’t crack from repeated use and can be easily cleaned and stored.
Rubbermaid Brilliance Clear Plastic Container with Lid (5-gallon)
Best for: Homesteaders new to fermentation seeking a reliable, transparent vessel
This 5-gallon food-grade container is perfect for starter fermentation batches. The clear plastic lets you monitor your ferment’s progress daily without opening the lid, reducing contamination risk. The snap-lock lid sits comfortably without sealing tight, allowing fermentation gases to escape naturally. Durable construction withstands repeated use, and the container stacks for easy storage. Measures roughly 11x11x14 inches.
Check Current Price on Amazon →Letica Premium 5-Gallon Food-Grade Bucket (Natural)
Best for: Budget-conscious homesteaders wanting opaque, durable fermentation vessels
An economical food-grade bucket with a loose-fitting lid ideal for chicken feed fermentation. The opaque white plastic prevents light degradation while remaining fully transparent enough to see ferment progression from the sides. Manufactured from virgin HDPE plastic rated for food storage. Includes a comfortable grip handles for easy transport from storage to coop. The simple design ensures reliability and longevity without unnecessary features.
Check Current Price on Amazon →Glaslock Premium Borosilicate Glass Container Set (10-quart with Locking Lid)
Best for: Homesteaders prioritizing chemical-free fermentation and aesthetic appeal
This premium borosilicate glass container eliminates any concern about plastic leaching while fermenting. The 10-quart capacity suits larger flocks or multiple batches. Glass is completely inert, transparent for easy monitoring, and naturally resists odor absorption. The hinged glass lid seals gently without trapping gases, making it ideal for extended fermentation. Borosilicate glass withstands temperature changes without cracking. Investment-grade durability means it will serve your homestead for decades.
Check Current Price on Amazon →Ball Wide-Mouth Quart Mason Jars (Set of 12)
Best for: Small flocks and first-time fermenters wanting to test the method risk-free
These classic wide-mouth quart jars are perfect for small-scale fermentation experiments. Their broad opening makes filling, stirring, and straining incredibly easy. Running multiple small jars lets you experiment with different ferment lengths simultaneously. The metal bands provide loose lids if you prefer not to seal them tight. Mason jars are non-reactive glass, incredibly affordable, and readily available everywhere. Perfect for homesteaders with 3-5 chickens.
Check Current Price on Amazon →Start Fermenting Today for Healthier, Happier Chickens
Fermented chicken feed is one of the highest-return investments you can make in your flock’s wellbeing. The process is simple, inexpensive, and requires minimal equipment beyond a food-grade container and a wooden spoon. Within days, you’ll see bubbling activity that proves beneficial bacteria are at work, transforming basic grains into a superfood that boosts digestion, nutrient absorption, and overall flock vitality. Many homesteaders report shinier feathers, fewer health issues, and noticeably improved egg production after introducing fermented feed.
Start with a single 5-gallon container and one week of committed daily stirring. You’ll quickly discover whether your setup works, what your flock prefers, and how to scale up for your specific needs. The container investment is modest compared to the long-term savings in feed efficiency and veterinary costs. Join thousands of successful homesteaders who’ve made fermentation part of their regular poultry care routine—your birds will thank you with vigor and productivity.
Frequently Asked Questions
Is fermented chicken feed safe? Will it make my chickens sick?
Yes, fermented feed is completely safe and actually beneficial for digestive health. The fermentation process creates beneficial bacteria similar to yogurt cultures. Chickens thrive on fermented grains. The only safety concern is mold, which appears as fuzzy growth and means that batch should be discarded.
Can I ferment medicated chicken feed?
No, medicated feeds should never be fermented because the fermentation process can reduce or eliminate medication effectiveness and create unintended chemical reactions. Stick to regular, non-medicated feeds for fermentation.
How often should I feed fermented grain to my chickens?
Begin with small amounts mixed into their regular feed and gradually increase to 10-20% of their total daily ration over one week. Some homesteaders offer it as a daily treat or supplement, while others use it as a partial meal replacement depending on their flock’s needs.
What temperature is ideal for fermentation?
Fermentation works best between 60-75 degrees Fahrenheit. Warmer temperatures (70-75F) speed up the process to 3-4 days, while cooler temperatures (60-65F) may take 7-10 days. Avoid freezing temperatures and extremely hot conditions above 80F.
Can I reuse the fermentation liquid (whey) from the previous batch?
Absolutely! The strained liquid accelerates fermentation in your next batch. Use it as your water base instead of fresh water, which can reduce fermentation time by a day or two and create a more robust ferment.
As an Amazon Associate, Build & Bloom earns from qualifying purchases. We only recommend products we genuinely think are useful. Prices and availability vary; check Amazon for the latest.
Leave a Reply