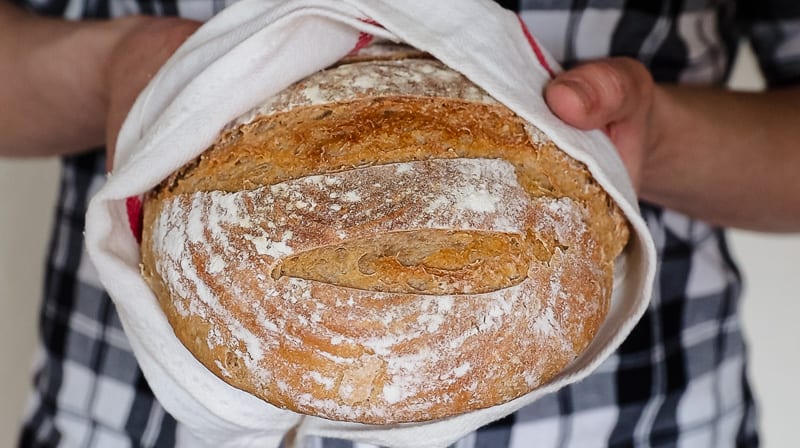

Making sourdough at home sounds intimidating, but the homestead approach strips away the complexity. If you’ve ever wanted to bake artisan bread without commercial yeast or expensive equipment, this beginner method gives you restaurant-quality loaves using ingredients you probably already have. The key is understanding fermentation timing rather than mastering fancy techniques.
How to Make Homestead Sourdough Bread
This method takes two to three days total, with most of that being passive fermentation. You’ll mix dough, let it rise, shape it, and bake it in a covered vessel to trap steam.
Ingredients
- 500g bread flour or all-purpose flour (about 4 cups)
- 350ml room-temperature water (about 1.5 cups)
- 100g active sourdough starter, fed 4-8 hours before use
- 10g sea salt or table salt (about 2 teaspoons)
- Extra flour for dusting and handling
Method
Mix the dough
Combine flour and water in a bowl, stirring until shaggy and all flour is moistened. Let this rest for 30-60 minutes (called autolyse). This hydration develops gluten naturally without extra kneading. Add your active starter and salt, then mix until fully incorporated using wet hands or a spoon.
Bulk fermentation with folds
Place dough in a covered container at room temperature (65-75F is ideal). Every 30 minutes for the next 2-3 hours, perform a stretch and fold: wet your hand, grab one side of the dough, stretch it up and fold it over itself, rotating the bowl after each fold. This builds structure without aggressive kneading. After folds finish, let it rest covered for 4-8 hours until it increases 50-75% in volume.
Shape the loaf
Turn dough onto a lightly floured surface. Pre-shape gently into a round, rest 20 minutes, then do a final shape by folding edges toward the center and rolling toward you to create tension. Place seam-side up in a floured proofing basket or bowl lined with a towel.
Cold overnight proof
Cover and refrigerate for 12-18 hours. This slow fermentation develops flavor and makes the dough easier to score. The cold slows yeast activity, giving you flexibility in timing.
Preheat your vessel
About 45 minutes before baking, preheat your covered Dutch oven or covered baker inside a 500F oven. A covered vessel traps steam, which creates that restaurant-style crust. This step is essential for homestead sourdough success.
Score and bake covered
Carefully turn dough onto parchment paper, then transfer to the preheated vessel. Score the top with a sharp blade to control where the loaf expands. Bake covered at 500F for 20 minutes to trap steam and maximize oven spring.
Finish uncovered
Remove the lid and reduce heat to 450F. Bake for 25-30 minutes more until the crust is deep golden brown and the loaf sounds hollow when tapped on the bottom. Internal temperature should reach 205-210F.
Cool completely
Transfer to a cooling rack for at least one hour before slicing. The crumb continues to set during cooling. Patience here prevents gummy interior, even though the aroma will tempt you to cut early.
- Keep your sourdough starter fed and bubbly before use. A starter that’s visibly active (doubled and bubbly within 4-8 hours of feeding) will ferment your dough reliably.
- Temperature matters more than exact timing. Warmer kitchens ferment faster; cooler ones move slower. Adjust your timeline but watch the dough, not the clock.
- A Dutch oven or covered baker is non-negotiable for beginners. The trapped steam is what creates that crispy, crackling crust homestead bakers love.
What to Look For in Sourdough Baking Equipment
- Dutch oven or covered baker: The foundation of sourdough success. It must retain heat well, have a tight-fitting lid to trap steam, and be oven-safe to 500F. Enameled cast iron is durable and traditional; ceramic alternatives work too.
- Proofing basket or banneton: Holds shaped dough during final proof and keeps it from spreading. Natural rattan is traditional and breathable; silicone versions last longer and release dough more easily for beginners.
- Scoring blade or lame: Controls how your loaf expands in the oven. A sharp blade (lame, box cutter, or razor) creates clean cuts that let steam escape predictably. Dull tools tear dough instead of slicing.
- Digital scale and thermometer: Precision ingredients and monitoring doneness. A basic kitchen scale (under $20) removes guesswork from flour and water ratios. A meat thermometer confirms internal temperature for perfectly baked loaves.
Le Creuset Enameled Cast Iron Dutch Oven
Best for: Serious home bakers seeking durability and heirloom quality
The gold standard for sourdough baking. Le Creuset Dutch ovens retain heat evenly, have a heavyweight lid that seals steam effectively, and last generations. The 5.5-quart round version is ideal for a 500g dough loaf. Yes, it’s an investment, but one Dutch oven handles bread, braised meats, and soups for decades. The sand-colored or flame-orange enamel interior resists staining and doesn’t require seasoning like bare cast iron.
Check Current Price on Amazon →Tramontina Enameled Cast Iron Dutch Oven
Best for: Budget-conscious beginners who need proven functionality
Tramontina delivers 90% of Le Creuset’s performance at half the price. It’s made in Brazil using the same enameled cast iron technology, with excellent heat retention and a tight-sealing lid. The 5.5-quart capacity handles standard sourdough batches. Slightly thinner walls than premium brands mean it heats a touch faster, which some bakers prefer. It’s widely available, backed by Amazon Prime, and has thousands of verified 5-star reviews from home bakers.
Check Current Price on Amazon →Artisan Pro Banneton Proofing Basket Liner
Best for: First-time sourdough makers avoiding shaping mistakes
A proofing basket (banneton) shapes your dough during final proof and prevents it from spreading flat. The Artisan Pro silicone liner version is forgiving: unlike natural rattan that needs seasoning and flour prep, silicone releases dough cleanly every time. It fits standard 9-inch round baskets (sold separately or included in bundles). The basket keeps dough from drying out, supports proper tension, and makes the transition from proof to baking seamless for beginners.
Check Current Price on Amazon →CALPHALON Contemporary Nonstick Dutch Oven
Best for: Budget bakers willing to trade some heat retention for savings
Calphalon’s nonstick-interior Dutch oven costs a third of traditional enameled cast iron and still works for sourdough. The ceramic nonstick coating reduces sticking when transferring dough, and the aluminum body heats faster than solid cast iron. It reaches 500F safely and the lid seals adequately for steam trapping. Not ideal for 50-year heirloom plans, but perfectly functional for someone testing the sourdough hobby before committing major dollars.
Check Current Price on Amazon →Staub Cast Iron Cocotte Dutch Oven
Best for: High-end bakers who value European craftsmanship and black enamel
Staub is Le Creuset’s sister brand (both owned by Groupe SEB) and offers slightly heavier enameled cast iron with superior heat distribution. The signature black matte enamel interior hides wear marks better than colored enamels. Staub’s rounded knob lid creates an even tighter seal for steam, and many professional sourdough bakers prefer the 0.2mm thickness for consistent crumb development. It costs about 15% less than Le Creuset while delivering equivalent performance.
Check Current Price on Amazon →OXO Good Grips Food Scale Digital
Best for: Home bakers needing precision ingredient measurement
Sourdough success hinges on flour-to-water ratios, and guessing by cups causes failure. The OXO digital scale measures in grams (and ounces), has a large, easy-read display, and a removable bowl so you can tare between ingredients. It’s accurate to 1 gram, affordable at under $30, and designed for kitchen durability. Pair it with our recipe’s metric measurements (500g flour, 350ml water, etc.) for consistent results every single bake.
Check Current Price on Amazon →Thermoworks ThermoPop Instant-Read Thermometer
Best for: Bakers who want foolproof doneness confirmation
Guessing when your sourdough is done cooking leads to underbaked gummy centers or overbaked dry loaves. The ThermoPop reads internal temperature in 3 seconds via a thin probe, accurate within 1 degree Fahrenheit. Target 205-210F for perfect sourdough doneness. It’s waterproof, folds for storage, and switches between F and C. Red exterior is durable and kitchen-visible.
Check Current Price on Amazon →Lame Bread Scoring Tool Stainless Steel Handle
Best for: Perfectionists seeking professional scoring control
A proper bread lame (scoring blade) cuts cleaner lines than razors or box cutters, giving you artistic control over how your loaf expands. The stainless steel handle feels professional and safe, the blade stays sharp for 50+ loaves, and angled cutting guides help beginners cut at the perfect 30-45 degree angle. It’s a $15-25 investment that transforms bread appearance from ‘homemade’ to ‘bakery-quality.’ A single sharp tool outlasts five dull box cutters.
Check Current Price on Amazon →Start Your Homestead Sourdough Journey
Homestead sourdough is less about equipment and more about patience and understanding fermentation. The beginner method here skips intimidating techniques (stretch-and-fold intimidates new bakers, but it’s just wet-hand finger pulls). You need an active starter, flour, water, salt, and a covered baking vessel. Everything else amplifies consistency and ease. Le Creuset or Tramontina gives you years of reliable baking; a banneton prevents shaping disasters; a scale removes guesswork.
The magic happens during fermentation, when wild yeast and bacteria transform simple dough into tangy, complex bread. Your first loaf might not be perfect, and that’s homesteading: you learn by doing, adjust next time, and gradually develop instinct no recipe can teach. In six months of regular baking, you’ll diagnose problems (sticky dough, flat loaves, dense crumb) instantly and fix them. Start with this method, invest in one good Dutch oven, and bake weekly. A year from now, you’ll be the person sharing sourdough tips with curious friends.
Frequently Asked Questions
Can I use regular all-purpose flour instead of bread flour?
Yes, absolutely. All-purpose flour (10-12% protein) works fine for beginner sourdough; bread flour (12-14% protein) develops slightly stronger gluten and chewier crumb, but the difference is subtle. Homestead bakers often use whatever flour they have on hand. Your fermentation timing and technique matter more than flour type.
My starter smells like acetone or paint thinner. Is it bad?
Not at all. That’s acetic acid, a natural byproduct of sourdough fermentation. It means your starter is active and healthy. If the smell bothers you, feed it more frequently (once daily instead of weekly) and it will become less pungent. As long as there’s no fuzzy mold, your starter is fine.
How do I know if my dough has fermented enough during bulk fermentation?
Look for a 50-75% volume increase and visible bubbles on the surface. The dough should feel airy and hold a slight indent when poked gently. If it’s warm (75F), bulk may take 4-6 hours; if cool (65F), it might take 8-10 hours. Don’t rush; cold fermentation develops better flavor anyway.
Can I skip the overnight cold proof and bake the same day?
Technically yes, but you’ll sacrifice flavor and structure. The 12-18 hour cold proof develops complex sour flavors and allows gluten to relax fully, giving you better oven spring and crumb. If you’re in a hurry, room-temperature final proof (2-4 hours) works, but plan for longer bulk fermentation to compensate.
What if I don’t have a Dutch oven?
A Dutch oven is strongly recommended, but in a pinch you can use an oven-safe covered pot, a ceramic bread baker, or even an inverted metal bowl on a baking stone. The key is trapping steam; without it, your crust will be thick and pale instead of crackling and golden. Commercial bakeries use steam injection chambers for this reason.
As an Amazon Associate, Build & Bloom earns from qualifying purchases. We only recommend products we genuinely think are useful. Prices and availability vary; check Amazon for the latest.
Leave a Reply