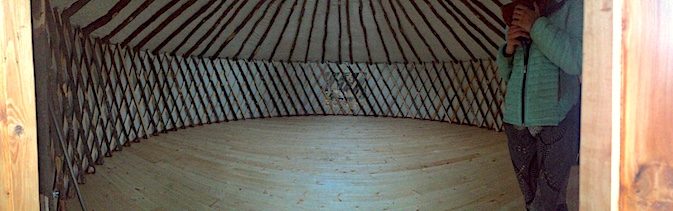

Yurts offer a beautiful alternative to traditional homes, but their circular shape and open layout present unique design challenges. Unlike rectangular rooms, you can’t simply push furniture against walls or rely on corners for storage. The key to a functional, comfortable yurt interior is understanding how to zone your space intentionally, work with the natural flow of a circular floor plan, and choose furnishings that respect both the geometry and the intimate scale of yurt living.
How to Plan Your Yurt Interior Layout
Design a yurt interior by first establishing functional zones, then selecting appropriately scaled furniture that complements the circular shape. This systematic approach ensures your space remains functional, visually balanced, and comfortable for daily living.
What You Will Need
- Measuring tape to determine your yurt’s diameter and wall height
- Graph paper or digital floor planning tool for sketching layouts
- Furniture dimensions (height, width, depth) for all pieces you’re considering
- Ventilation diagram showing roof ring position and stove placement
- Natural light assessment noting window and door positions
Steps
Measure Your Space Precisely
Start by measuring the interior diameter of your yurt from wall to wall, the distance from floor to wall-roof junction, and the height to the roof ring. Document the exact location of your entrance door and any windows. These measurements become your foundation for all planning decisions and help you visualize scale when considering furniture pieces.
Identify Your Primary Zones
Mentally divide your yurt into functional areas: sleeping area (typically placed opposite the entrance), kitchen zone (near utilities and ventilation), living area (central gathering space), and heating zone (around your stove). In a circular layout, these zones don’t require walls–simply position furniture and rugs to define each area visually and functionally.
Plan Your Heating System First
Your stove placement determines everything else. Position it centrally if possible, leaving adequate clearance (typically 3-4 feet minimum) from walls and furniture for safety. Plan your chimney pipe routing to work with your roof ring opening. Heating considerations constrain your layout more than any other element, so resolve this before placing other furniture.
Design Your Sleeping Area
Position beds opposite the entry door for privacy and visual balance. Consider raising beds slightly on platforms to create storage underneath and improve air circulation. In a yurt, the sleeping area often occupies roughly one-third of the circle. Ensure adequate headroom and a clear sightline to your main living area.
Establish Your Kitchen Zone
Place your kitchen counter and cooking area near utilities (water access, gas/propane hookups) and away from sleeping zones. Position it to take advantage of your stove’s heat if you have a wood-burning stove, or ensure adequate ventilation if using other cooking methods. Kitchen efficiency matters more than aesthetics in a yurt’s limited space.
Create Vertical Storage Plans
Yurts offer limited floor space but excellent vertical opportunities. Plan shelving units along your wall to maximize storage without consuming precious floor area. Hang items from the roof ring’s interior structure where safe and appropriate. This approach keeps your space feeling open while providing necessary storage for homestead supplies, kitchen equipment, and personal items.
Map Ventilation and Airflow
Sketch how air naturally moves through your space, particularly near your stove and cooking zone. Plan your window opening strategy to support cross-ventilation. Poor airflow leads to condensation, moisture problems, and general discomfort. Your layout should support natural circulation patterns rather than create dead zones.
Assess Furniture Scale Against Your Space
Before purchasing any pieces, verify they won’t overwhelm your circular interior. Oversized furniture makes yurts feel cramped despite their open footprint. Choose pieces with visible legs (not skirted) to maintain visual lightness. Stand in your empty space and use cardboard boxes to mock-up furniture dimensions before committing to purchases.
- Use area rugs to define zones without blocking visual flow–they’re the yurt designer’s best tool for creating distinct areas while maintaining the open, circular feeling.
- Select furniture on casters or wheels for sleeping areas and kitchen zones so you can easily reconfigure your layout seasonally or to accommodate guests.
- Install a ceiling vent or cupola in addition to your stove chimney to support summer cooling and year-round air quality, which should influence where you position your living areas.
What to Look For in Yurt Interior Furnishings
- Scale and Proportion: Yurts typically feel cramped with standard residential furniture. Look for pieces that are slightly more compact than you’d normally choose, with visible bases to maintain visual lightness. Test pieces in your space before purchasing whenever possible.
- Vertical Storage Solutions: Shelving units, wall-mounted cabinets, and hanging storage become essential in limited yurt spaces. Prioritize storage that doesn’t consume floor space and can accommodate seasonal rotation of homestead equipment and supplies.
- Heating Compatibility: If using a wood stove, choose furniture that can withstand heat, humidity fluctuations, and the occasional spark. Materials should be durable and low-maintenance. Consider furniture placement relative to your stove’s safe clearance zones.
- Flexibility and Mobility: Pieces on wheels or modular components allow you to reconfigure your layout for different seasons, activities, or guest accommodations. This flexibility transforms a yurt from feeling static into a truly adaptable living space.
Starrett Steel Tape Measure 100-Foot
Best for: Accurate yurt measurements
A durable, long-reach measuring tape is your first essential tool when planning a yurt interior. This Starrett model extends 100 feet and includes both metric and imperial measurements, crucial for capturing your yurt’s full diameter, wall heights, and furniture dimensions. The reinforced blade resists bending, ensuring accuracy in circular spaces where measuring at multiple angles is necessary. Professional-grade construction means it’ll handle homestead use for years.
Check Current Price on Amazon →AmazonBasics Stainless Steel Measuring Tape 25-Foot
Best for: Budget-conscious homesteaders
If a 100-foot tape exceeds your budget, this compact AmazonBasics model covers furniture measurements and most interior dimensions you’ll need. At 25 feet, it handles typical yurt sizing tasks efficiently. The stainless steel housing resists corrosion from homestead humidity, and the retractable design keeps it portable. Ideal for sketching layouts and verifying furniture fit before purchase.
Check Current Price on Amazon →Magnatiles Magnetic Tiles Clear Colors 100 Piece Set
Best for: 3D yurt layout visualization
Building a physical model of your yurt layout helps you visualize furniture placement in three dimensions. These magnetic tiles allow you to construct a circular wall representation and arrange small magnetic furniture cutouts to test different configurations. Though marketed for kids, designers use these for space planning. The clear colors let you see through to your floor plan beneath, and you can photograph arrangements for reference.
Check Current Price on Amazon →Fiskars Titanium Softgrip Scissors Universal
Best for: Cutting graph paper layouts
When designing your yurt interior on paper or cardboard, quality scissors make creating scale models faster and more precise. These Fiskars titanium scissors cut through cardboard, graph paper, and fabric cleanly without slipping. The soft grip reduces hand fatigue during the detailed work of mapping furniture layouts and testing different zone configurations across multiple iterations.
Check Current Price on Amazon →Design Your Yurt Interior with Confidence
A well-designed yurt interior transforms a unique structure into a genuinely comfortable living space. By measuring precisely, identifying functional zones, and prioritizing your stove placement first, you create the framework for all subsequent decisions. The circular footprint of a yurt isn’t a limitation–it’s an advantage that encourages open, flow-oriented design once you understand how to work with it rather than against it.
Start your planning with paper and measurements, then use simple tools like area rugs, modular furniture, and vertical storage to bring your design to life. Yurt living rewards intentional design choices and flexibility: plan for seasonal changes, test furniture positioning before committing to purchases, and don’t hesitate to reconfigure your layout as your needs evolve. The homesteaders with the most functional, comfortable yurt interiors are those who invested time in understanding their circular space before filling it with furniture.
Frequently Asked Questions
Can I use standard furniture in a yurt interior?
Standard residential furniture often overwhelms yurt spaces due to scale differences. While you can use regular pieces, look for slightly smaller or more compact options with visible legs to maintain visual lightness. Test furniture in your space before purchasing, and plan removable items for seasonal changes.
Where should I place my wood stove in a yurt layout?
Position your stove centrally when possible, maintaining 3-4 feet minimum clearance from walls and furniture for safety and draft efficiency. Stove placement constrains your entire layout, so plan it first before arranging sleeping, cooking, and living zones around it. Ensure your chimney routing works with your roof ring opening.
How do I maximize storage in a yurt interior?
Vertical storage is essential in yurts. Install wall-mounted shelving, hang items from the roof ring structure, use under-bed storage boxes, and choose furniture with built-in compartments. This approach keeps your limited floor space open while providing ample storage for homestead supplies and personal items.
What’s the best way to define separate zones in an open yurt?
Use area rugs, strategic furniture placement, and subtle height changes (like platform beds) to delineate zones without blocking sight lines. Rugs are particularly effective for creating visual boundaries while maintaining the open feeling that makes yurts appealing. Avoid solid walls or heavy barriers that fragment your space.
How should I plan ventilation when designing my yurt interior layout?
Map natural airflow patterns and position your cooking and stove zones where ventilation is strongest. Plan window opening strategy to support cross-ventilation, and consider adding a ceiling cupola for summer cooling. Poor airflow leads to moisture and condensation issues, so ventilation should guide your zone placement decisions.
As an Amazon Associate, Build & Bloom earns from qualifying purchases. We only recommend products we genuinely think are useful. Prices and availability vary; check Amazon for the latest.
Leave a Reply