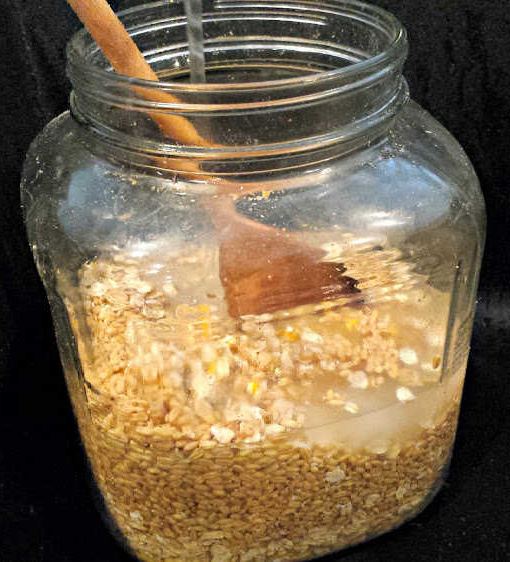

Backyard chicken keepers constantly search for ways to stretch their feed budget without sacrificing flock nutrition. Fermenting your chicken feed is one of the most effective cost-saving strategies available–it reduces the amount of feed your birds need to eat by up to 30%, improves nutrient absorption, and creates a probiotic-rich food that keeps your chickens healthier. Best of all, the process is remarkably simple and uses ingredients you likely already have on hand.
How to Ferment Chicken Feed at Home
Fermentation harnesses natural bacteria to break down grain, making nutrients more bioavailable to your flock while extending feed supplies. The entire process takes about a week and requires minimal equipment.
What You Will Need
- A food-grade container (5-gallon bucket, glass jars, or similar) with a lid that allows airflow
- Whole grains or pelletted chicken feed (whatever you normally feed)
- Clean, dechlorinated water (let tap water sit 24 hours or use filtered water)
- A spoon or paddle for stirring
- A strainer or fine mesh screen for draining
- Optional: a cloth or coffee filter to cover the opening for airflow without debris
Steps
Fill Your Container with Feed
Pour dry chicken feed into your container until it fills about one-third of the way. Use whole grains like oats, barley, or corn for best results, though pelletted feed works too. The amount you prepare depends on your flock size and feeding frequency–start with a small batch to test the process.
Add Water to Cover
Pour clean, dechlorinated water over the feed until it’s covered by about 2 inches. The grain will absorb water and expand, so don’t fill the container all the way. Stir well to break up any clumps and ensure all feed makes contact with water.
Loosely Cover and Let Sit
Place a loose-fitting lid or cloth over the container opening. This allows oxygen to reach the fermentation culture while preventing dust and debris from falling in. Leave at room temperature (65-75 degrees F is ideal) away from direct sunlight.
Stir Daily for 3-7 Days
Each morning and evening, stir the mixture thoroughly for about a minute. You’ll notice bubbles forming and the smell becoming slightly sour–this is beneficial bacteria at work. Continue stirring until you see consistent fizzing and a pleasant, yogurt-like aroma develops.
Observe the Signs of Fermentation
Around day 3-4, you should notice white foam, bubbles, and a tangy smell. The grain will appear darker and softer. If you see fuzzy mold (usually white or blue), discard the batch and start over. Dark surface liquid is normal and indicates thriving fermentation.
Drain Before Feeding
When fermentation is complete, place a strainer over a bucket and pour the fermented feed through it. Save the drained liquid (called ‘fermentation juice’) to add to fresh batches or as a probiotic water for your flock. The wet grain is now ready to feed.
Feed to Your Flock
Offer fermented feed in a separate dish from regular grain. Start by mixing it with dry feed at a 25% ratio, then gradually increase over a week as your birds adjust. Most flocks will eagerly consume it. Fermented feed spoils faster than dry feed, so offer only what will be eaten in a few hours.
Start Your Next Batch
Immediately begin fermenting more feed to maintain a continuous supply. Many keepers prepare three batches on a rotating schedule, so fresh fermented feed is always ready. Save some fermentation juice from your previous batch to jumpstart the next one for faster fermentation.
- Save the drained fermentation liquid and add it back to fresh batches–it contains beneficial bacteria that speed up fermentation on subsequent rounds, sometimes reducing the time to 2-3 days.
- Ferment in a cool location; temperatures above 80 degrees F can encourage harmful mold instead of beneficial bacteria. Winter is often the easiest season to start.
- Keep fermented feed separate from dry feed to prevent spoilage. Use a dedicated bucket or container for your flock’s daily feeding.
What to Look For in Fermentation Containers
- Food-Grade Material: Containers must be food-safe to avoid leaching chemicals into fermented feed. Glass, stainless steel, and BPA-free plastic rated for food storage are all suitable. Avoid containers that previously held pesticides, chemicals, or non-food items.
- Adequate Capacity: For most backyard flocks, 5-10 gallons is ideal. Larger containers hold more feed but take longer to ferment and are harder to manage. Consider your flock size and how often you want to prepare fresh batches.
- Drainage Capability: Look for containers with spigots, or be prepared to use a separate strainer. Easy drainage means less mess and faster feeding time. Containers with holes or screens built in simplify the process considerably.
- Secure but Breathable Lid: The lid should sit loosely or have small airflow holes to allow oxygen exchange while keeping out pests, dust, and debris. A cloth secured with a rubber band also works perfectly and costs nothing.
Rubbermaid Brilliance 5-Gallon Storage Container with Lid
Best for: Backyard chicken keepers starting fermentation
This clear, food-grade plastic bucket is the most popular choice for fermenting chicken feed because of its ideal 5-gallon capacity, transparent sides so you can monitor fermentation progress, and secure-fitting lid. The durable polypropylene construction is safe for food and won’t degrade or leach chemicals. Many homesteaders keep multiple containers on rotation for continuous fermented feed production. The straight sides and wide opening make stirring and draining easy.
Check Current Price on Amazon →Gorilla 5 Gallon Food Grade Bucket with Gamma Seal Lid
Best for: Budget-conscious keepers wanting durable fermentation vessels
This heavy-duty, food-grade bucket comes with a secure gamma seal lid that can be opened and resealed easily without removing completely. The 5-gallon capacity is perfect for most backyard flocks, and the opaque white plastic holds up well to outdoor storage. The included lid fits snugly, so you can drill small holes in the top for controlled airflow. At a lower price point than specialty fermentation containers, this is an excellent value for someone serious about feed fermentation.
Check Current Price on Amazon →Ball Wide Mouth Mason Jar, 64 oz Quart (Set of 4)
Best for: Small flocks and first-time fermenters wanting to start small
Starting small with glass mason jars is an excellent way to test fermentation without committing to large batches. This four-jar set lets you rotate batches and experiment with different grain types simultaneously. Glass allows perfect visibility of fermentation progress, and the wide mouth opening makes stirring and draining straightforward. These jars are inexpensive, incredibly durable, and become a kitchen staple. Smaller batches mean faster fermentation times and less risk of spoilage.
Check Current Price on Amazon →Fermentationculture Glass Fermentation Crock with Lid and Weights
Best for: Serious homesteaders wanting dedicated fermentation equipment
This specialized fermentation vessel comes with a fitted glass lid and ceramic weights specifically designed for keeping feed submerged during fermentation. The heavy-duty borosilicate glass won’t stain or degrade with use, and the weighted design ensures consistent results every time. While more expensive than standard storage containers, it’s a worthwhile investment if you’re fermenting multiple batches weekly long-term. The professional design signals commitment to quality fermentation and produces superior batches.
Check Current Price on Amazon →Start Fermenting This Week
Fermented chicken feed is one of the simplest, most cost-effective improvements you can make to your flock’s nutrition and your homestead budget. The process requires no special skills, minimal equipment, and produces results within days. Whether you start with a mason jar or invest in a dedicated fermentation bucket, you’ll immediately see your feed costs drop while your birds noticeably thrive. The initial learning curve is gentle, and the long-term savings speak for themselves.
Begin with a single small batch this week using whatever food-grade container you have on hand. You’ll witness the magical transformation as grain and water become a probiotic powerhouse over just seven days. Once you experience your flock’s enthusiasm for fermented feed and see your monthly feed expenses decline, you’ll wonder why you didn’t start sooner. Join thousands of backyard chicken keepers who’ve discovered that fermentation is the easiest way to stretch feed budgets and boost flock health simultaneously.
Frequently Asked Questions
How much does fermented feed actually save per month?
Most keepers report using 25-30% less feed because fermented grain is more nutrient-dense and digestible. For a flock of six hens eating approximately 12 pounds of feed weekly, fermenting reduces consumption to about 9 pounds, saving roughly $15-25 monthly depending on feed costs in your region. Savings compound significantly over a year.
What happens if mold grows in my fermentation batch?
White and gray surface molds are normal during fermentation, but fuzzy blue or pink molds indicate contamination–discard immediately. Prevent contamination by ensuring clean containers, using dechlorinated water, and maintaining proper airflow. If batches repeatedly fail, try using a smaller water-to-feed ratio or relocating to a cooler spot.
Can I use chicken pellets instead of whole grains?
Yes, pelletted feed ferments well, though whole grains often produce better results and ferment faster. Pellets contain more binders that can create a mushy consistency, but chickens still enjoy and benefit from fermented pellets. Mix pellets with whole oats or barley for optimal texture and fermentation speed.
Do I need to refrigerate fermented chicken feed?
No, fermentation preserves the feed naturally at room temperature. However, once drained and offered to chickens, fermented feed spoils faster than dry feed (within a few hours in warm weather), so offer only what birds will eat in 2-3 hours. The drained fermentation liquid keeps refrigerated for several weeks.
Will fermented feed make my chickens sick or change egg flavor?
No, fermented feed is probiotic-rich and actually improves digestive health and immune function. It won’t change egg flavor or color. Most keepers report healthier birds with shinier feathers, fewer digestive issues, and improved laying consistency after transitioning to fermented feed.
As an Amazon Associate, Build & Bloom earns from qualifying purchases. We only recommend products we genuinely think are useful. Prices and availability vary; check Amazon for the latest.
Leave a Reply