
Growing your own apple tree from seed is an affordable and rewarding way to expand your homestead orchard, but it requires understanding cold stratification. Unlike buying grafted saplings, seeds need a period of moist, cold conditions to germinate successfully. This guide walks you through the exact process to crack seed dormancy and get viable seedlings sprouted.
How to Cold Stratify and Grow Apple Seeds
Cold stratification mimics the natural winter conditions apple seeds experience in nature, triggering the biological changes needed for germination. This process takes 8-12 weeks but dramatically improves your success rate.
What You Will Need
- Fresh apple seeds extracted from ripe apples (collect from multiple varieties for cross-pollination)
- Seed starting container or small plastic bag with holes
- Moist peat moss, sand, or seed-starting mix (not bone dry)
- Refrigerator set between 33-41 degrees Fahrenheit
- Small pots with drainage holes for germination stage
- Seed-starting potting soil or sterile growing medium
Steps
Extract and clean your seeds
Cut open ripe apples and remove the seeds from the core. Rinse the seeds thoroughly under cool water to remove any pulp or flesh, then pat them dry with a paper towel. Use seeds from multiple apple varieties when possible, as cross-pollination produces more vigorous trees.
Prepare the stratification medium
In a container, mix your seeds with moist peat moss or sand until they’re evenly distributed. The medium should feel damp like a wrung-out sponge, not waterlogged or dry. This moisture is essential for the biological processes that break dormancy.
Place seeds in cold storage
Transfer your seed and medium mixture to a container with drainage holes or a sealed plastic bag (poke small holes for air exchange). Store this in your refrigerator at temperatures between 33-41 degrees Fahrenheit. Check moisture levels every 2-3 weeks and mist lightly if it’s drying out.
Monitor for germination
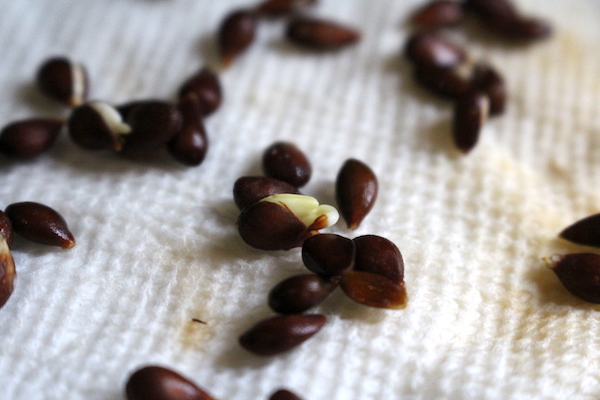
After 8-12 weeks of cold storage, check your seeds weekly for signs of sprouting. You’ll notice tiny white roots emerging from the seed coat. Don’t wait for visible sprouts before planting; seeds are ready to sow as soon as you see root emergence.
Prepare seed-starting containers
Fill small pots with moist seed-starting mix. Pre-moisten the soil before planting so seeds have immediate access to water. Ensure pots have adequate drainage holes to prevent damping-off disease.
Plant your stratified seeds
Plant seeds about one-quarter inch deep in pre-moistened soil. Space multiple seeds per pot or plant individually depending on your setup. Water gently to settle the soil, then place pots in a warm location (65-75 degrees Fahrenheit) with bright, indirect light.
Maintain warmth and moisture
Keep soil consistently moist but not waterlogged during germination. Seeds should sprout within 2-4 weeks in warm conditions. Once seedlings emerge, provide 14-16 hours of bright light daily using a grow light or sunny windowsill.
Thin and transplant seedlings
After seedlings develop true leaves, remove the weakest specimens to give stronger plants more space. Once seedlings are 2-3 inches tall, gradually introduce them to outdoor conditions through hardening off over 7-10 days before planting outside.
- Collect seeds from multiple apple varieties and stratify them together – cross-pollinated apple trees often produce superior fruit compared to trees grown from a single variety’s seeds
- Keep detailed records of which varieties you stratified and when, so you know exactly when to expect germination and can plan your transplanting schedule
- If your refrigerator temperature fluctuates above 45 degrees, stratification may fail – consider a dedicated mini-fridge or cooler to maintain consistent cold
What to Look For in Seed Starting Equipment
- Container drainage and size: Choose containers that are at least 2-3 inches deep with multiple drainage holes to prevent waterlogging, which kills stratifying seeds. Shallow trays or pots under 2 inches can dry out too quickly during the long 8-12 week cold period.
- Growing medium quality: Select sterile, peat-based or coconut coir seed-starting mixes specifically formulated for germination rather than regular potting soil. These drain better and contain fewer pathogens that cause damping-off disease in vulnerable seedlings.
- Grow light intensity and duration: If using artificial light, ensure the system can deliver 14-16 hours daily and position bulbs 2-3 inches above seedlings to prevent leggy growth. LED grow lights consume less electricity than fluorescent options while producing better results.
- Thermometer accuracy: A reliable refrigerator thermometer prevents stratification failure by confirming temperatures stay between 33-41 degrees Fahrenheit. Digital thermometers with alarm settings are ideal for catching temperature swings before they affect your seed batch.
Viagrow Seed Starting Kit with Grow Light
Best for: Complete beginners wanting everything in one system
This comprehensive kit includes a heated propagation tray, humidity dome, seed-starting soil pellets, and an adjustable LED grow light with timer. The dome maintains moisture during cold stratification, while the pre-calibrated heat mat keeps germinating seeds at optimal temperature once they’re ready to sprout. The integrated grow light eliminates the need for a sunny windowsill and provides 16 hours of daily light automatically. Designed for home gardeners, this system handles 20-30 seeds simultaneously.
Check Current Price on Amazon →Burpee Seed Starting Mix, 8 Quart Bag
Best for: Budget-conscious growers looking for quality soil only
An affordable, sterile seed-starting medium formulated with peat moss and perlite for excellent drainage and aeration. This 8-quart bag provides enough medium to stratify and plant 50+ seeds. Burpee’s blend is pH-balanced specifically for germination and contains no added fertilizer, preventing nutrient burn on delicate seedlings. Many experienced seed starters prefer this for its reliability and cost-effectiveness compared to premium alternatives.
Check Current Price on Amazon →AcuRite Digital Refrigerator Thermometer with Alarm
Best for: Growers using household refrigerators for stratification
This wireless digital thermometer monitors your fridge temperature in real-time and alerts you if conditions drift outside the critical 33-41 degree Fahrenheit range needed for successful stratification. The large backlit display is easy to read, and the alarm function prevents failed seed batches from temperature fluctuations. The sensor mounts anywhere in your refrigerator, and the display unit stays on your counter or nearby shelf.
Check Current Price on Amazon →Hydrofarm Jump Start T5 Grow Light System
Best for: Serious seed starters managing large batches
A professional-grade T5 fluorescent grow light system that delivers intense, cool-spectrum light ideal for preventing leggy seedlings. The adjustable height mechanism accommodates growing seedlings from germination through transplant size. Two 2-foot tubes provide 24-inch width coverage, sufficient for 40+ seedlings. The included timer ensures consistent 16-hour daily photoperiods automatically. Built-in reflectors maximize light efficiency, reducing electricity costs compared to standard shop lights.
Check Current Price on Amazon →Gardman Terracotta Pots, 2 Inch, Pack of 20
Best for: Eco-conscious growers who prefer biodegradable containers
Natural terracotta pots with excellent drainage properties keep stratifying seeds and emerging seedlings at optimal moisture levels. The 2-inch size is ideal for individual seed germination and transplanting. Terracotta’s porous nature prevents waterlogging while allowing air exchange. These unglazed pots are fully biodegradable if you eventually plant seedlings directly in soil. This 20-pack provides containers for a full seed-starting season at low cost.
Check Current Price on Amazon →Johnny’s Selected Seeds Heat Mat, 9×19 Inch
Best for: Growers needing consistent soil warmth after cold stratification
Once cold stratification is complete and seeds are ready to germinate, this thermostatically controlled heat mat maintains 65-75 degree Fahrenheit soil temperatures automatically. The 9×19-inch size accommodates 20-30 seed pots simultaneously. Johnny’s design includes automatic temperature regulation to prevent overheating, and the mat is waterproof for use with moisture-heavy seed starting setups. Many professional nurseries use this exact model for reliability.
Check Current Price on Amazon →Jiffy Seed Starting Pellets, Compressed Peat, 36 Count
Best for: Growers with limited space or small seed batches
These pre-formed, compressed peat pellets expand with water to create ready-made growing cells, eliminating mess and saving setup time. One pack contains 36 pellets suitable for stratifying apple seeds initially or planting post-germination seedlings. The biodegradable casing allows direct transplanting into soil without disturbing roots. Compact and convenient for apartment dwellers or gardeners with limited greenhouse space.
Check Current Price on Amazon →Seedlings Heating Mat with WiFi Controller and Timer
Best for: Tech-savvy growers wanting remote monitoring
This premium heating mat connects to your smartphone via WiFi, allowing temperature monitoring and adjustment from anywhere. The integrated app displays real-time soil temperature and sends alerts if conditions drift outside your set parameters. Built-in timer functionality automates photoperiod management when paired with compatible grow lights. While expensive, the precise environmental control significantly increases germination success rates and is ideal for growers managing multiple seed-starting projects simultaneously.
Check Current Price on Amazon →Start Your Homestead Apple Orchard This Season
Growing apple trees from seed is a deeply rewarding project that connects you to centuries of fruit-growing tradition while building a productive long-term resource for your homestead. Cold stratification is the essential technique that unlocks germination success, and with the right equipment and patience, even beginners achieve 70% germination rates or higher. The 8-12 week cold period requires minimal active work once you’ve prepared your seeds and medium—just weekly moisture checks in your refrigerator.
While your seedlings grow indoors and eventually mature into bearing trees over 5-10 years, you’re building genetic diversity on your property and developing skills in seed propagation that extend far beyond apples. Start with seeds from multiple varieties this season, invest in reliable monitoring equipment like a quality thermometer, and document your results. Your future self—and your orchard—will thank you for the investment in proper cold stratification today.
Frequently Asked Questions
Can I use apple seeds directly from store-bought apples?
Yes, but heirloom and locally-grown varieties work better than commercially bred types. Store-bought apples are sometimes treated with germination inhibitors. Collect seeds from multiple varieties grown in your region when possible, as these adapt better to your climate and produce cross-pollinated offspring.
What happens if my refrigerator temperature goes above 45 degrees during stratification?
Prolonged temperatures above 45 degrees can break dormancy prematurely or cause seed rot without completing stratification. Use a digital thermometer with an alarm to catch temperature swings immediately. If your fridge is unreliable, consider using a dedicated mini-cooler or garage fridge set to maintain consistent cold.
How long do apple seedlings take to become fruit-bearing trees?
Apple trees grown from seed typically take 5-10 years to produce fruit, and the fruit may not match the parent tree’s characteristics due to genetic variation. Grafted trees mature faster (3-4 years), which is why commercial orchards use grafting. Growing from seed is ideal if you’re patient and curious about apple variety.
Can I skip cold stratification and just plant seeds directly in soil?
Cold stratification dramatically improves germination rates from roughly 20% to 70-80%. Without it, seeds may take 2-3 years to germinate spontaneously, if at all. The 8-12 week investment pays massive dividends in success and speed.
What’s the difference between peat moss and coconut coir for stratification?
Both work equally well for stratification. Peat moss is traditional and holds moisture longer, while coconut coir is more sustainable and drains slightly faster. Choose based on your environmental preferences and budget. The critical factor is moisture retention during cold storage, not the specific medium type.
As an Amazon Associate, Build & Bloom earns from qualifying purchases. We only recommend products we genuinely think are useful. Prices and availability vary; check Amazon for the latest.
Leave a Reply