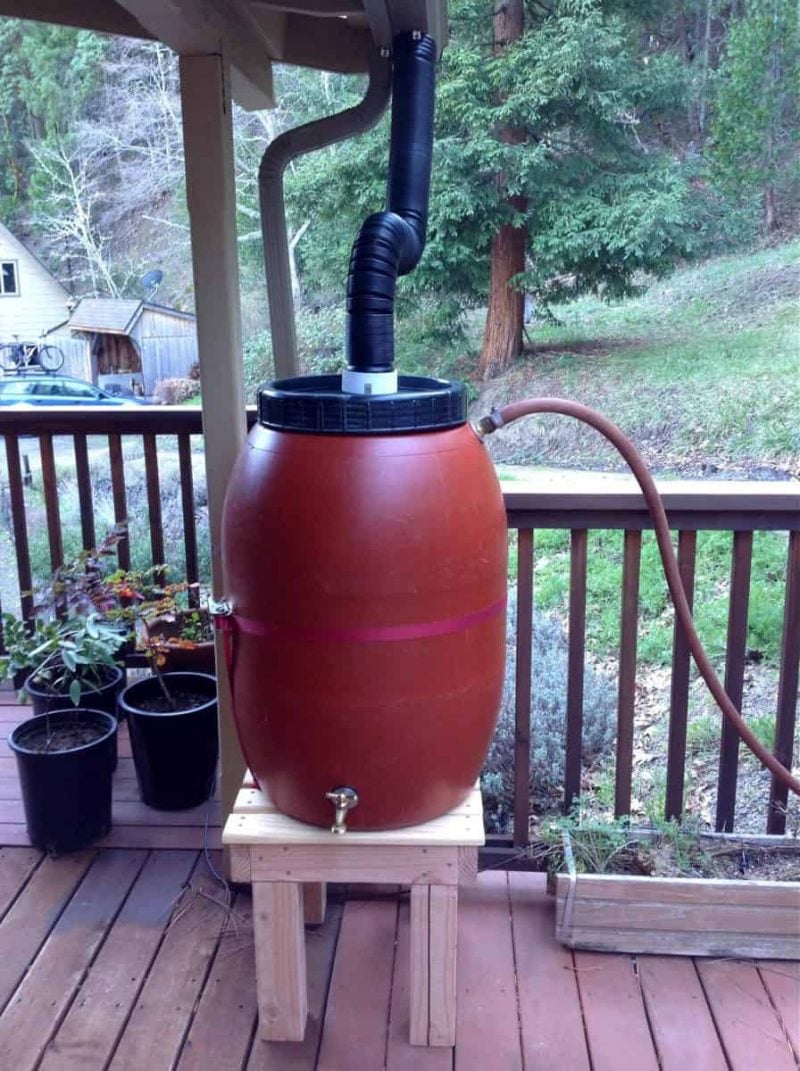

If you’re serious about off-grid living or just want to reduce your water bill while gardening more sustainably, a rain barrel is one of the most practical investments you can make. Instead of letting thousands of gallons of water run off your roof each year, a properly built rain barrel captures that free resource and delivers it directly to your garden beds, raised planters, and thirsty plants. The best part? You can build a functional system in an afternoon with basic tools and readily available materials.
How to Build Your Own Rain Barrel System
This project requires no special plumbing experience. By following these steps, you’ll have a working rain barrel that integrates seamlessly with your existing gutter system.
Materials You Will Need
- A large food-grade plastic barrel or drum (55-100 gallons) – must be food-safe to avoid chemical leaching
- A spigot or brass faucet with washer and threading – mounted near the bottom for water withdrawal
- A downspout diverter or connector kit – channels water from your gutter into the barrel
- Screen mesh or fine grating – covers the barrel opening to keep out leaves, insects, and debris
- Overflow hose (3/4 to 1 inch diameter) – directs excess water away from your foundation
- Basic hand tools – drill, hole saw bit, adjustable wrench, and teflon tape for sealing threads
Steps
Prepare and position your barrel
Choose a level, stable location near a downspout and close to the area you want to water. Place the barrel on cinder blocks or a sturdy platform 12-18 inches off the ground — this height allows gravity to push water through the spigot more effectively. Ensure the ground beneath is compacted and won’t shift, as a full barrel weighs 300-400 pounds.
Drill the spigot hole
Mark a spot 4-6 inches up from the bottom of the barrel on the side facing your garden. Using a drill with an appropriate hole saw bit, create a hole slightly smaller than your spigot’s threaded end. The opening should be low enough to drain the barrel completely, but high enough to keep sediment from clogging the spigot.
Install the spigot
Insert the spigot through the hole from the inside, ensuring a tight fit. Use teflon tape around the threaded portion to create a watertight seal. From outside, hand-tighten the nut securely using an adjustable wrench. Test the seal by pouring water in the barrel to confirm no leaks occur around the fitting.
Cut and seal the top opening
If your barrel has a sealed top, cut a 6-8 inch hole to receive water from the downspout. Cut a larger opening in the lid itself to accommodate your downspout connector while leaving room for a screen. Use a utility knife or reciprocating saw depending on the barrel material thickness.
Install the downspout diverter
Disconnect your existing downspout and insert the diverter kit at that junction. Position the diverter so water flows into the barrel when it’s empty, and automatically bypasses into the original downspout once the barrel is full. Secure all connections with brackets and stainless steel hardware to prevent separation during heavy rains.
Attach the overflow hose
Drill a second hole near the top of the barrel for the overflow hose. Install a bulkhead fitting or simple hose connector in this hole, then attach the overflow tubing. Route this hose away from your foundation toward a garden bed or drainage area so excess water doesn’t pool around your home’s base.
Add screening and covers
Cut fine mesh screening to fit over the top opening before installing the lid. This prevents mosquitoes from breeding in stagnant water and keeps leaves and debris out. Secure the screen with a hose clamp or duct tape, then fit the lid back in place, leaving a small gap for air circulation.
Test your system
Wait for the next rainfall and monitor how water enters the barrel. Watch for leaks at the spigot and overflow connections. Run water out through the spigot to test flow rate and confirm the faucet handle works smoothly. Make adjustments to the downspout diverter if water overshoots the barrel or fails to flow properly.
- Paint your barrel a dark color or install it in partial shade — this prevents algae growth and keeps water cooler for plants.
- Add a second barrel by connecting them with overflow hoses, doubling your storage capacity without taking up twice the space.
- Clean or replace your screen quarterly, especially after storms, to maintain water quality and prevent mosquito breeding.
What to Look For When Choosing Rain Barrel Components
- Barrel Material and Food-Grade Rating: Always choose barrels explicitly labeled food-grade or certified for potable water contact. Avoid painted drums or those with unknown contents, as chemicals can leach into your water. Polyethylene plastic (HDPE) is the standard, offering durability without rust.
- Capacity and Placement Constraints: Standard 55-gallon barrels fit most residential setups, but measure your gutter location and available space first. Consider that a full barrel weighs 400+ pounds — ensure your platform can support it and that you have foot traffic clearance for refilling watering cans.
- Spigot Quality and Material: Brass or stainless steel spigots resist corrosion better than plastic and provide smoother operation. Look for models with sealed threads and a quarter-turn design for quick on-off control. Avoid cheap plastic spigots that crack under pressure or freeze in winter.
- Diverter System Compatibility: Downspout diverters should match your gutter size (typically 2×3 or 3×4 inches). First-flush diverters are ideal because they divert the initial dirty runoff before water enters your barrel, improving water quality for sensitive plants or washing tasks.
Rubbermaid EarthCare 55-Gallon Rain Barrel
Best for: Most homeowners seeking a complete, ready-to-use solution
This dark-colored, food-grade polyethylene barrel comes pre-drilled with spigot and overflow ports, eliminating the guesswork of installation. The unit features a decorative design that blends into landscaping, a built-in screen lid to prevent mosquitoes and debris, and includes all necessary fittings and hoses. At 55 gallons, it captures substantial rainfall without requiring a reinforced platform, making it ideal for first-time rain barrel owners.
Check Current Price on Amazon →RTS Home Accents 50-Gallon Vertical Rain Barrel
Best for: Budget-conscious gardeners wanting basic functionality
A straightforward 50-gallon option that removes premium pricing without sacrificing functionality. The barrel includes a spigot and basic overflow hose, though it requires standard DIY installation of additional screening. The compact, space-efficient design fits tight corners and against foundation walls, and the lower price point ($60-80) makes it perfect for those testing the rain barrel concept before investing in larger systems.
Check Current Price on Amazon →Good Ideas ImpCyl100 In-Ground 100-Gallon Rain Barrel
Best for: Homeowners wanting high capacity with simple installation
This 100-gallon capacity barrel sits slightly in-ground or on a shallow berm, providing maximum water storage without excessive height. It comes with an integrated spigot and overflow system, plus a removable lid for easy screen installation. The elevated placement still allows gravity-fed watering, and the larger volume means fewer refill cycles during dry spells, making it excellent for serious gardeners.
Check Current Price on Amazon →Suncast Aqua Savior 65-Gallon Decorative Rain Barrel
Best for: Homeowners prioritizing aesthetics and durability
This premium barrel mimics the appearance of a wooden rain barrel with decorative wood-grain finish, making it attractive enough to display front-yard. The UV-resistant resin construction withstands sun exposure without fading or degradation, while the integrated brass spigot and overflow valve ensure reliable performance. At 65 gallons with a sturdy metal grate top, it combines form and function for upscale landscapes.
Check Current Price on Amazon →Start Collecting Rainwater Today
Building a rain barrel is one of the highest-impact DIY projects you can tackle for your homestead. Not only do you reduce dependence on municipal water systems and lower your utility bills, but you’re also building resilience into your garden infrastructure. A functional barrel system pays for itself within one growing season, especially if you maintain thirsty garden beds or livestock watering stations. The 8-hour investment transforms how you think about resource conservation.
Whether you choose a basic barrel kit to start or invest in a premium multi-unit system, the core principle remains the same: capture free water and use it intentionally. Pair your rain barrel with drip irrigation or soaker hoses to maximize efficiency, and you’ll notice healthier plants, reduced water waste, and lower environmental impact. Start with one barrel this season, and as your confidence and needs grow, expand your system. Every gallon you capture is a gallon you’re not paying for — and that’s the true power of off-grid living.
Frequently Asked Questions
Is rainwater safe to drink directly from a rain barrel?
No. Rainwater collected from roof runoff can contain bacteria, debris, and chemical residue from shingles or gutters. Use collected rainwater for irrigation, outdoor cleaning, and watering livestock, but boil or filter it if you need drinking water. A quality whole-house filter system is required for potable use.
How much water can I realistically collect?
One inch of rainfall on a 1,000-square-foot roof yields approximately 600 gallons. A typical 55-gallon barrel fills with just one moderate rainfall, so consider your climate and rainfall frequency. In areas with seasonal rain, multiple barrels or larger capacity systems make sense.
What happens to my rain barrel in winter?
Empty and store your barrel indoors or drain it completely before the first freeze. Water expands as it freezes, potentially cracking the barrel and damaging fittings. Remove the spigot and overflow valve, dry all components, and store them in an unheated garage or shed until spring.
Can mosquitoes breed in my rain barrel?
Yes, mosquitoes can lay eggs in just a teaspoon of standing water. Prevent breeding by keeping your barrel covered with tight-fitting mesh screening and a sealed lid. Check screens quarterly and clean out any leaves or debris that might trap moisture and create breeding sites.
Do I need a permit or inspection for a rain barrel?
Requirements vary by location. Some cities encourage rain barrels with no restrictions, while others limit collection to specific barrel sizes or require inspection. Check your local municipal code or contact your county extension office before installation to confirm any regulations.
As an Amazon Associate, Build & Bloom earns from qualifying purchases. We only recommend products we genuinely think are useful. Prices and availability vary; check Amazon for the latest.
Leave a Reply