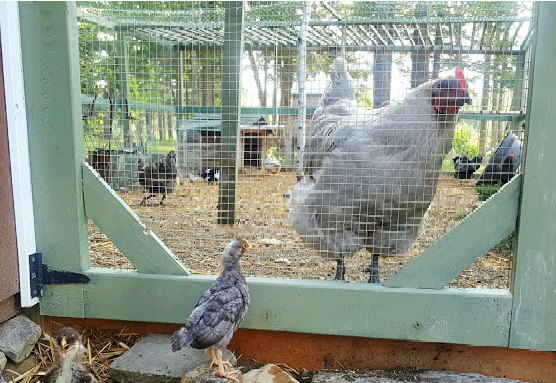

Adding young chicks to an established flock is one of the trickiest transitions in backyard chicken keeping. Your existing hens have a strict pecking order, and newcomers are seen as threats to that hierarchy. Without a careful integration plan, older birds will aggressively peck, injure, or even kill vulnerable new arrivals. The good news: with patience and a proven step-by-step process, you can introduce new chicks successfully and watch your flock peacefully expand.
How to Safely Integrate New Chicks Into Your Flock
The key to successful flock integration is slow, gradual exposure. New chicks need time to grow large enough to defend themselves, and established birds need time to accept them as part of the group.
What You Will Need
- A brooder setup or separate enclosure (heat lamp, bedding, waterer, feeder)
- A temporary divider or isolation coop with shared fencing
- Multiple feeding and water stations to reduce competition
- A larger run or enclosed area for supervised outdoor time
- Nesting boxes and roosts sized appropriately for chicks
Steps
Raise chicks in a separate brooder for 6-8 weeks
Keep new chicks completely isolated in a brooder with a heat source, appropriate bedding, and their own food and water. This protects them while they grow large enough to hold their own against established birds. Ensure the brooder is draft-free and maintains 95°F the first week, decreasing 5 degrees each week.
Create visual contact through fencing
Once chicks are feathered and moving to a young pullet stage (around 6-8 weeks), place their enclosure adjacent to or within sight of the established flock’s run. This allows birds to see and interact through fencing without physical contact. Keep them separated for at least 1-2 weeks so each group can adjust to the other’s presence.
Monitor behavior during the visual contact phase
Watch for excessive pecking, aggressive posturing, or signs of fear. Some curiosity and pecking at the fence is normal. If aggression escalates significantly, extend this phase another week. Look for calm, curious behavior from the established birds as a sign of readiness for closer contact.
Introduce supervised outdoor time in a shared space
Place both groups in a larger run or enclosed yard where they can interact directly but you’re present to intervene. Start with short 30-minute sessions. Provide multiple feeding stations spread far apart so aggressive birds can’t monopolize food. Add enrichment objects like branches or logs to break up sight lines and provide escape routes for new chicks.
Gradually increase time together over 2-4 weeks
Extend supervised sessions from 30 minutes to 1-2 hours daily, then to several hours over the course of two weeks. Keep the separate enclosure available so chicks can retreat to safety if needed. Watch for any serious injuries and separate birds if fights escalate beyond typical pecking order establishment.
Transition to full-time integration at night first
Once daytime interactions are calm, allow new chicks to sleep in the main coop with established birds at night while still separating during the day for another week. This works because birds are calmer in darkness and pecking order aggression is reduced. Chickens often accept newcomers more readily once they’ve shared roosting space.
Remove the divider and allow full access
After about a week of shared nighttime roosting, remove any dividers completely and allow free roaming during daylight hours. Continue close supervision for several more days. Some pecking and re-establishing of hierarchy is normal and expected. Avoid intervening unless there’s genuine injury or extreme aggression.
Confirm integration by observing for 1-2 weeks
Watch for signs of acceptance: new birds foraging naturally alongside the flock, eating and drinking without constant harassment, and roosting peacefully at night. Once these behaviors are consistent without intervention, your flock is successfully integrated. The entire process typically takes 4-8 weeks depending on age differences and individual temperaments.
- Add distractions like mealworms, greens, or bugs to the shared space during introductions–pecking at food redirects aggression away from newcomers
- The smaller the size difference between new and established birds, the easier integration. Growing chicks to 8-10 weeks before introduction dramatically improves success rates
- Provide multiple escape routes and hiding spots in the run–nervous chicks need places to retreat to build confidence without being cornered
What to Look For in Chicken Integration Equipment
- Brooder durability and size: Your brooder needs to safely contain growing chicks for 6-8 weeks. Look for sturdy construction that won’t collapse, adequate ventilation to prevent respiratory issues, and enough floor space (1/4 square foot per chick) for healthy growth and movement.
- Heat lamp safety features: A reliable heat source with automatic temperature control prevents brooding failures. Choose lamps with ceramic sockets, secure mounting hardware, and protective guards to prevent chicks from touching hot surfaces or bedding from catching fire.
- Divider quality and installability: Temporary fencing between flocks must be sturdy enough to prevent escapes and breaches, yet easy to remove without tools. Look for hardware cloth or chicken wire with secure attachment points that won’t sag or develop gaps.
- Feeder and waterer accessibility: Multiple feeding stations prevent competition-related aggression. Choose waterers and feeders appropriately sized for your chicks’ age, with spillage-resistant designs. Height-adjustable models grow with your birds from brooder through integration.
Brinsea Brooder 20 Complete Chick Brooder System
Best for: First-time flock expanders and anyone wanting reliability
The Brinsea Brooder 20 is a professionally-designed, all-in-one system that eliminates guesswork from the critical 6-8 week raising period. The integrated heat system maintains precise temperatures automatically, the solid construction prevents escapes, and the generous floor space accommodates 20+ chicks comfortably. Built-in ventilation and easy-to-clean removable components make daily management simple. This brooder is the foundation of successful integration because healthy, well-socialized chicks in a stress-free environment adapt to the flock far more smoothly than poorly-raised alternatives.
Check Current Price on Amazon →Farm Innovators Model 3200 Heated Chicken Waterer
Best for: Budget-conscious growers needing reliable hydration
Consistent water access is critical during integration because stress increases drinking. This heated waterer prevents freezing in cold climates and holds 3 gallons, reducing refill frequency. The durable construction and simple design mean fewer mechanical failures during the sensitive brooding phase. At under $40, it’s an economical way to ensure new chicks never suffer from dehydration while they adjust to the flock’s presence.
Check Current Price on Amazon →Rubbermaid Pulse Lamp Base with Ceramic Socket
Best for: New chicken keepers unfamiliar with heat lamp installation
Proper heat lamp mounting is non-negotiable for safety. This pre-assembled lamp base features a ceramic socket rated for 250-watt bulbs, sturdy metal construction, and a clamp system that securely attaches to brooder walls or hanging frames. The design prevents the common beginner mistake of setting lamps too low or on unstable surfaces. Unlike jury-rigged setups, this dedicated base distributes heat evenly and safely, reducing fire risk and chick mortality during those critical growth weeks when integration prep depends on strong, healthy birds.
Check Current Price on Amazon →SureHatch Premium Heated Brooder Plate
Best for: Homesteaders wanting the most humane heating method
Heating plates mimic a mother hen’s warmth more naturally than lamps, reducing stress and behavioral issues in brooding chicks. The SureHatch Premium model covers up to 40 chicks with consistent 90-95°F warmth, adjustable legs for different bedding depths, and silent operation. Chicks raised under heating plates tend to be calmer and less prone to aggression, making them easier to integrate into established flocks. The $150 investment pays dividends in higher survival rates and smoother social adjustment.
Check Current Price on Amazon →Your Path to Flock Expansion Success
Integrating new chicks into an established flock is one of the most rewarding–and most delicate–aspects of expanding your homestead. Following these eight steps and providing the right equipment removes most of the guesswork and dramatically increases the chance that your new birds will thrive alongside your existing flock. The 4-8 week timeline may feel long, but it’s a small investment in exchange for avoiding the heartbreak of losing young birds to pecking aggression or the stress of managing constant territorial conflicts.
Start with a quality brooder system and reliable heat source to grow strong, confident chicks. Layer in the dividers, multiple feeding stations, and careful observation during the introduction phases. Within 2 months, what seemed like impossible social mixing will become a calm, integrated flock where birds cooperate peacefully, forage together, and establish a sustainable pecking order. Your careful preparation pays off every single day as you collect eggs from a harmonious, healthy backyard flock.
Frequently Asked Questions
How old should new chicks be before integrating with an existing flock?
New chicks should be at least 6-8 weeks old and roughly the same size as younger members of your established flock. At this age, they’re large enough to defend themselves against pecking and can thermoregulate without a heat lamp. Integrating chicks younger than 6 weeks almost always results in injury or death from aggressive older birds.
What if my established flock is extremely aggressive during introductions?
Extend the visual contact phase to 3-4 weeks instead of 1-2 weeks, and reduce supervised interaction time to 15-20 minute sessions initially. Some flocks need more gradual acclimation. If aggression remains extreme after 4 weeks of contact, the birds may be incompatible personalities, and you may need to maintain a permanent separation or rehome one group.
Can I integrate chicks of different ages at the same time?
Yes, if chicks are within 2-4 weeks of each other in age. They’ll form a sub-group for mutual support during flock integration, which actually improves overall success. Never mix chicks that are more than 4 weeks apart, as size differences create predator-prey dynamics that are hard to overcome.
How long does the entire integration process take?
Plan for 4-8 weeks total: 6-8 weeks of brooding, 1-2 weeks of visual contact, 2-4 weeks of supervised interactions, and 1-2 weeks of confirmation. The timeline varies based on age differences, individual temperaments, and flock size. Rushing any phase risks serious injury or integration failure requiring complete separation.
What signs indicate my chicks are ready to join the main flock permanently?
Look for calm coexistence: chicks eating and drinking without constant harassment, roosting peacefully at night, foraging naturally alongside older birds, and lacking visible injuries or feather loss. If you see these behaviors consistently over 3-4 days without your supervision, integration is complete and the birds will settle into their new hierarchy.
As an Amazon Associate, Build & Bloom earns from qualifying purchases. We only recommend products we genuinely think are useful. Prices and availability vary; check Amazon for the latest.
Leave a Reply