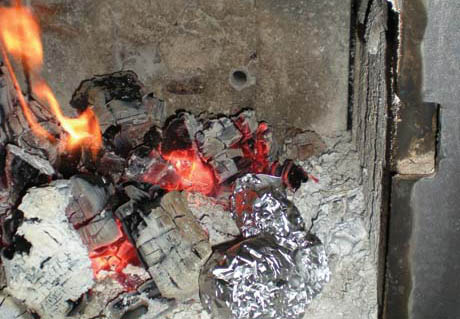

If you’re dreaming of off-grid living or simply want to embrace traditional cooking methods, a woodstove opens up entirely new possibilities in the kitchen. But there’s a real skill to it—and it starts with understanding how to build and maintain a proper bed of coals. Unlike gas or electric heat that responds instantly, woodstove cooking demands patience and technique. The good news? Once you understand the fundamentals, you’ll unlock a level of cooking control that feels almost intuitive, and your food will taste better for it.
How to Build and Maintain a Coal Bed for Woodstove Cooking
A successful coal bed is the foundation of woodstove cooking. It provides the steady, radiant heat that lets you bake, simmer, and fry with precision.
What You Will Need
- Seasoned hardwood (oak, maple, or hickory preferred; never softwood or treated lumber)
- Heavy cast cooking vessel or flat cooking surface compatible with your stove
- Long-handled metal tools: poker, shovel, and tongs for moving coals safely
- Fire grate or ash grate to allow air circulation beneath the coals
- Metal thermometer or heat indicator for monitoring temperature
Steps
Light the stove and let wood burn down completely
Begin with a clean stove and grate. Stack your hardwood loosely to allow air flow, then light it. Let the wood burn for at least 30-45 minutes until the flames subside and you’re left with glowing wood that’s beginning to collapse into coals. This initial burn-down is crucial—you need hot, mature coals, not partially burned wood.
Push coals toward the center and build your coal base
Once you have a good volume of glowing coals, use your poker to gather them into a concentrated bed directly under where you’ll place your cooking vessel. The coal bed should be 4-6 inches deep for most cooking tasks. Spread them as evenly as possible so heat distributes uniformly beneath your pan or pot.
Adjust air vents to stabilize heat output
Your stove’s damper and air intake vents control how hot the coals burn. Close the damper partway and adjust the intake vents to achieve a steady, moderate temperature—you’re aiming for gentle, consistent heat rather than intense flames. Listen and watch for the coal bed to glow steadily without excessive flame.
Place your cooking vessel on the grate above the coals
Once your coal bed is stable, position your heavy pan or cooking vessel directly over it, using the grate or cooking surface your stove provides. Allow 2-3 minutes for the vessel to heat evenly before adding food. You should feel radiant heat rising, not scorching heat from below.
Monitor temperature by coal proximity and additions
Woodstove heat is controlled by moving your cooking vessel closer to or farther from the coal bed, and by adding fresh coals around the edges as needed. Small adjustments go a long way. If food is cooking too fast, slide the vessel away from the hottest part of the coal bed. If it’s progressing slowly, draw coals closer or add a few fresh coals.
Add wood to maintain coals throughout cooking
As you cook, your coal bed will gradually be consumed. Add a few pieces of split hardwood to the sides of the coal bed every 15-20 minutes, depending on your cooking task. These will burn down into fresh coals that sustain your heat. Never dump a large log on top of an active cooking area—it will disrupt your temperature.
Use tools to redistribute coals if hot spots develop
Occasionally your coal bed will develop uneven hot spots. Use your poker and shovel to gently redistribute coals, evening out the heat profile beneath your vessel. This is especially important for baking or slow simmering, where uniform heat prevents burning or cold spots.
Let coals settle before removing your vessel
When you’ve finished cooking, carefully slide your vessel away from the coal bed and allow it to cool slightly on a heat-safe surface. Resist the urge to touch the vessel directly—use tongs or thick gloves. The coal bed can be left to burn down naturally or pushed to the sides of the stove for future cooking.
- Seasoned hardwood is non-negotiable—wet or green wood produces smoke and ash instead of clean coals. Split your wood at least 6 months in advance so it reaches 15-20% moisture content.
- Cast iron is your best friend on a woodstove. It heats evenly, retains heat beautifully, and can handle the direct radiant heat that would damage thinner cookware.
- Keep a logbook of your first dozen cooking sessions, noting wood type, coal bed depth, damper position, and results. Patterns will emerge that help you dial in the perfect setup for your specific stove.
What to Look For in Woodstove Cooking Equipment
- Cooking Vessel Material: Cast iron is superior for woodstove cooking because it distributes heat evenly, won’t warp, and can handle thermal shock. Stainless steel works but heats unevenly; avoid thin aluminum entirely.
- Heat Management Tools: You need at least three tools: a long-handled poker for moving coals, a flat shovel for gathering, and sturdy tongs for repositioning vessels. Look for long handles (18+ inches) to keep your hands away from intense radiant heat.
- Grate Quality: A sturdy, removable grate prevents coals from falling into the ash pan and allows adjustable cooking heights. Cast iron grates outlast steel; check that yours fits your stove model exactly.
- Temperature Control Features: Adjustable damper and air intake vents are essential for fine-tuning heat. High-quality dampers move smoothly and seal tightly; poor seals cause temperature swings that ruin cooking.
Lodge Cast Iron Dutch Oven 5.5 Quart
Best for: Serious woodstove cooks who need one versatile vessel
The Lodge Dutch oven is the gold standard for woodstove cooking. Its thick cast iron walls distribute heat uniformly, the heavy lid traps moisture for braising and baking, and the construction can withstand decades of direct coal-bed cooking. At 5.5 quarts, it’s large enough for family meals yet manageable for one person. Pre-seasoned and ready to use immediately, this single vessel handles soups, stews, bread, roasted vegetables, and slow-cooked meats. The smooth cooking surface improves with age.
Check Current Price on Amazon →Traeger Grill Tools 3-Piece Set
Best for: First-time woodstove cooks who need safe, basic equipment
This affordable three-piece set includes a poker, shovel, and tongs—exactly what beginners need to manage coals safely. The 24-inch handles keep hands far from radiant heat, and the tools are sturdy enough for daily use without being heavy. While designed for grills, the long handles and durable construction make this ideal for starting out on a woodstove. Once you develop preferences, you may upgrade individual pieces, but this set removes the barrier to entry.
Check Current Price on Amazon →Victoria Cast Iron Skillet 12 Inch
Best for: Budget-conscious cooks who want excellent cast iron quality
Victoria produces hand-finished cast iron at a lower price point than premium brands, without sacrificing quality. This 12-inch skillet is perfect for sauteing, pan-frying, and shallow braising directly on the coal bed. The polished cooking surface is smoother than mass-produced cast iron, meaning less seasoning work and better non-stick performance. Colombian-made and backed by a lifetime warranty, Victoria offers exceptional value for off-grid homesteaders building a cast iron collection.
Check Current Price on Amazon →Smithey Cast Iron Heirloom Skillet 12 Inch
Best for: Cooks who prioritize heritage quality and stunning craftsmanship
Smithey represents the pinnacle of American cast iron manufacturing. Each skillet is hand-finished to a glassy smoothness that rivals vintage pieces, with perfect weight distribution and heat retention. The 12-inch size is ideal for woodstove cooking, and the investment-quality construction means this skillet will serve your grandchildren. It’s pricey, but if you view cookware as heirlooms rather than disposables, Smithey’s commitment to excellence justifies the cost.
Check Current Price on Amazon →Start Your Woodstove Cooking Journey Today
Woodstove cooking isn’t just a practical skill for off-grid living—it’s a gateway to slower, more intentional food preparation that reconnects you with traditional cooking methods. The learning curve is real, but it’s absolutely manageable. Start with a quality cast iron vessel, invest in proper coal-moving tools, and commit to your first dozen cooking sessions where you’ll observe, adjust, and learn. Keep notes on what works, and don’t be discouraged by early mistakes. Every experienced woodstove cook has burned something or created a temperature swing—it’s part of the process.
The rewards are substantial. You’ll discover that cast iron cast on a coal bed produces flavors that modern cookware can’t match. Bread baked in a Dutch oven develops a crust and crumb structure that feels almost magical. Slow-cooked stews become complex and deeply satisfying. And perhaps most importantly, you’ll develop a tangible connection to your food and the heat source that cooks it. Whether you’re building an off-grid homestead or simply exploring traditional skills, mastering the coal bed transforms your kitchen into a place of skill, craft, and genuine culinary possibility.
Frequently Asked Questions
How long does it take to get a proper coal bed established?
Expect 45 minutes to an hour from lighting the stove to having a stable, ready-to-cook coal bed. This includes the initial burn-down time and settling period. Once you’re familiar with your specific stove, you’ll develop a feel for optimizing this process.
Can I use softwood or treated lumber in my woodstove for cooking?
No—never use softwood or treated lumber. Softwoods produce excessive ash and creosote, which contaminates food and damages the stove. Treated lumber releases toxic chemicals when burned. Stick to seasoned hardwoods like oak, maple, hickory, or applewood.
What’s the difference between cooking on a woodstove versus a regular stovetop?
Woodstove cooking relies on radiant heat from beneath the vessel rather than direct burner heat, giving you gentler, more even cooking. The trade-off is that it’s slower and requires active management—you can’t just turn a dial. Many cooks prefer the results, especially for slow cooking and baking.
Do I need a special thermometer to monitor woodstove cooking temperature?
A basic meat thermometer or oven-safe probe thermometer helps, but experienced woodstove cooks often rely on visual cues (coal color and brightness) and sound (gentle simmering vs. rolling boil). Start with a thermometer to calibrate your judgment, then you can cook by instinct.
How do I clean cast iron cookware after woodstove cooking?
Let the vessel cool completely, then wipe with a damp cloth or soft brush while warm—never submerge in water. For stubborn food, use a paste of salt and oil to scrub, then wipe clean. Dry immediately with a cloth and wipe a thin layer of oil to maintain seasoning. Proper maintenance keeps cast iron non-stick and rust-free for decades.
As an Amazon Associate, Build & Bloom earns from qualifying purchases. We only recommend products we genuinely think are useful. Prices and availability vary; check Amazon for the latest.
Leave a Reply