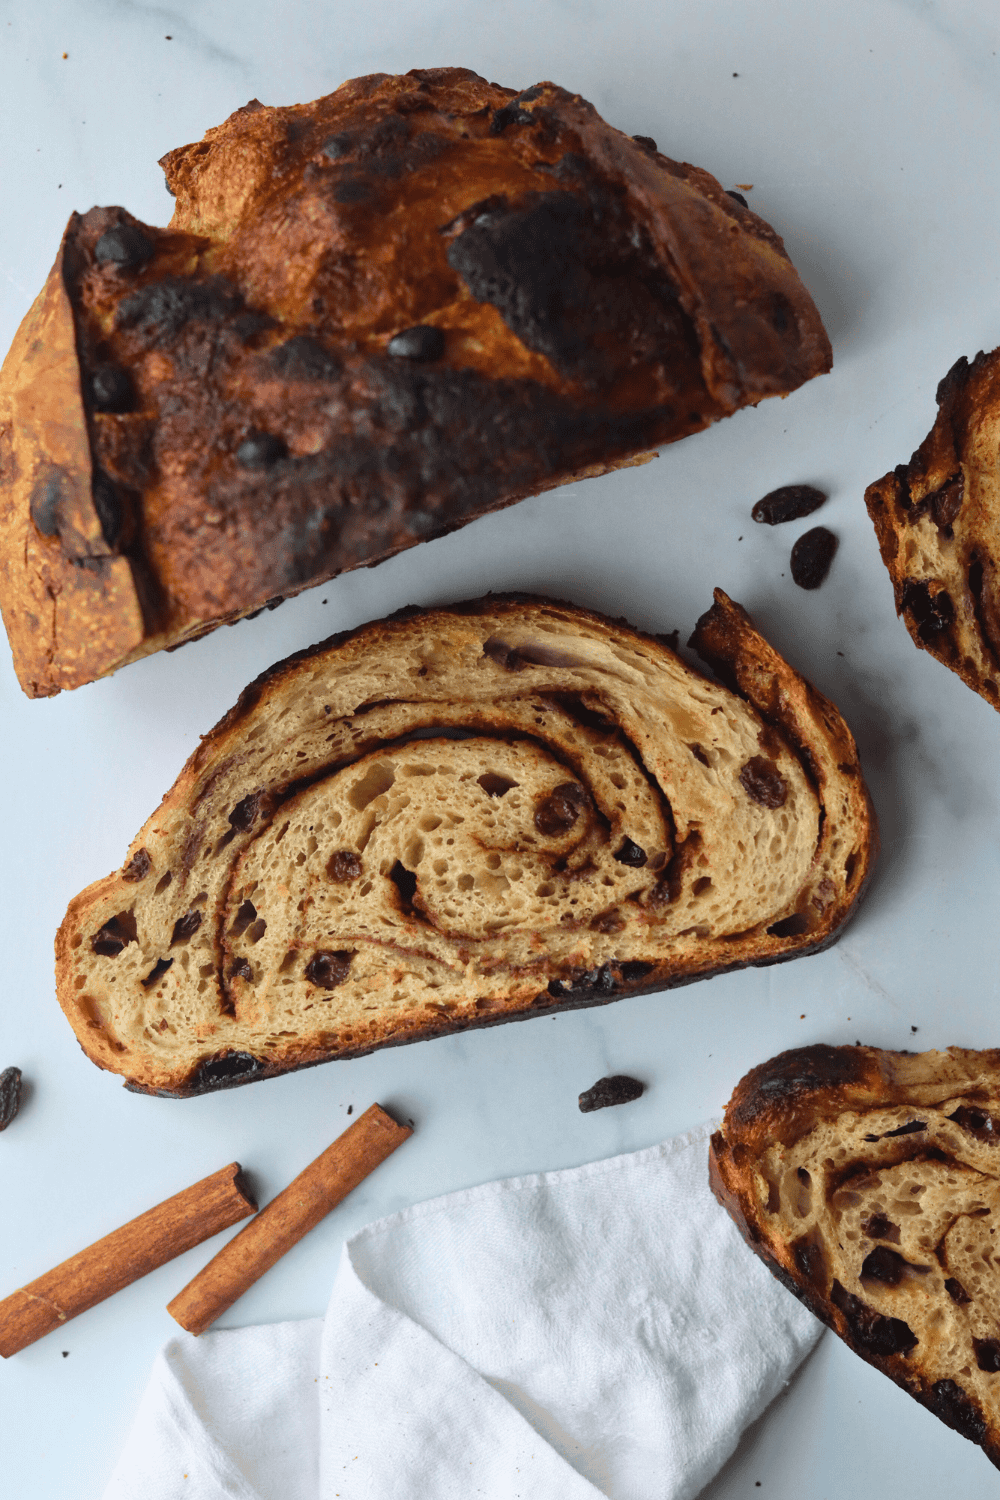

If you’ve mastered basic sourdough but want to elevate your baking with warm spices and sweet raisins, cinnamon raisin sourdough is the perfect next step. The challenge isn’t complicated—it’s getting the timing right so the cinnamon-sugar swirl stays distinct while the raisins plump up beautifully during fermentation. This recipe walks you through each stage, from preparing your starter to scoring your loaf.
How to Bake Cinnamon Raisin Sourdough Bread
This recipe creates one beautifully swirled loaf with a crispy crust and soft, flavorful crumb. Plan for approximately 24-48 hours total time, with most of it being passive fermentation.
Ingredients
- Active sourdough starter (fed 4-8 hours prior) – 100g
- Bread flour – 450g
- Water – 350ml, divided
- Sea salt – 10g
- Raisins – 80g, soaked in warm water for 15 minutes
- Ground cinnamon – 1.5 tablespoons mixed with 30g sugar for filling
Method
Mix your dough
Combine the active starter with 300ml of water in a bowl, stirring until mostly dissolved. Add flour and let it rest (autolyse) for 30 minutes. Add salt and remaining water, mixing thoroughly until shaggy and no dry flour remains. The dough should be slightly sticky but hold together.
Build strength through folding
Over the next 3-4 hours, perform 4 sets of stretch-and-folds at 30-minute intervals. Wet your hand, grab one side of the dough, stretch it up and fold it over itself. Rotate the bowl and repeat from all four directions. This develops gluten without traditional kneading.
Bulk fermentation
Allow the dough to rise at room temperature for 4-6 hours until it increases by 50-75% in volume and jiggles when the bowl is gently shaken. The dough should feel airy but still hold structure. Perform one final set of folds halfway through.
Shape and add the filling
Turn dough onto a lightly floured work surface. Using a rolling pin, gently flatten into a rectangle about 1/4-inch thick. Drain the plumped raisins and scatter them evenly across the surface. Sprinkle the cinnamon-sugar mixture uniformly over the raisins. Roll tightly from the long end, creating tension as you go, and seal the seam by pinching firmly.
Cold proof overnight
Place the shaped loaf seam-side up in a floured banneton basket or a bowl lined with a kitchen towel. Cover and refrigerate for 12-18 hours. This long, cold fermentation develops flavor and makes scoring easier. The dough will be cold and firm when you remove it.
Prepare your baking vessel
Preheat your oven to 500F for at least 45 minutes with a heavy pot or Dutch oven inside. This traps steam early in baking, creating the coveted oven spring and crispy crust that sourdough lovers crave.
Score and bake covered
Carefully remove the chilled loaf from the refrigerator. Turn it out onto parchment paper and make one decisive slash across the top with a sharp blade, holding it at a 30-degree angle. Transfer to the preheated pot and cover with the lid. Bake at 500F for 25 minutes covered to trap steam.
Finish baking uncovered
Remove the lid and reduce heat to 450F. Bake for an additional 25-30 minutes until the crust is deep golden brown and the loaf sounds hollow when tapped on the bottom. Cool on a wire rack for at least 1 hour before slicing to let the crumb set.
- Soak your raisins in warm water 15 minutes before adding them—this plumps them up so they stay chewy rather than hard in the finished loaf.
- Keep a kitchen thermometer handy: dough ferments fastest between 75-78F. If your kitchen is cooler, fermentation will take longer; warmer temperatures speed things up.
- Don’t skip the cold overnight proof. It’s not a shortcut—it’s essential for developing the deep, complex flavor that makes sourdough special, plus it makes scoring much easier.
Essential Equipment for Baking Sourdough at Home
- Dutch Oven: A heavy covered pot that traps steam during baking, creating the crispy, caramelized crust that defines quality sourdough. Look for enameled cast iron that can withstand oven temperatures of 500F or higher without damage.
- Banneton Proofing Basket: A cloth-lined or wicker basket that shapes your dough during the final proof while preventing it from spreading. Prevents your loaf from flattening and makes transferring to the oven safer and easier.
- Lame or Scoring Knife: A razor-sharp blade used to score the top of your loaf before baking, controlling where the bread expands and creating the signature ear. Essential for directing oven spring and achieving professional-looking slashes.
- Kitchen Scale: Precise measurement by weight—not volume—is critical for sourdough success. A reliable digital scale ensures consistent hydration ratios and batch-to-batch reproducibility, removing guesswork from your baking.
Le Creuset Enameled Cast Iron Dutch Oven 5.5 Qt
Best for: Serious sourdough bakers who want heirloom-quality equipment
Le Creuset’s iconic Dutch oven has been the gold standard for bread baking for decades. The heavy cast iron construction distributes heat evenly, the tight-fitting lid traps steam perfectly, and the enameled interior won’t rust or require seasoning. At 5.5 quarts, it accommodates large loaves. The color and craftsmanship make it beautiful enough to go straight from oven to table. Worth the investment for bakers serious about perfecting their craft.
Check Current Price on Amazon →Tramontina Enameled Cast Iron Dutch Oven 6.5 Qt
Best for: Budget-conscious beginners learning sourdough techniques
Tramontina delivers professional-grade performance at half the cost of premium brands. This 6.5-quart Dutch oven handles large loaves beautifully, heats evenly, and the enamel coating is durable and easy to clean. You sacrifice some aesthetic refinement compared to luxury options, but the baking results are virtually identical. Perfect for someone testing whether sourdough is a long-term hobby before committing significant money.
Check Current Price on Amazon →Staub Cast Iron Cocotte Round 5.5 Qt
Best for: Bakers who value European craftsmanship and aesthetic design
Staub’s French cast iron is precision-engineered with a textured black interior that’s naturally non-stick and doesn’t require seasoning maintenance. The self-basting lid design creates superior steam circulation for exceptional crust development. Available in multiple sophisticated colors, it performs identically to Le Creuset but with a different design philosophy. Ideal for bakers who appreciate engineering excellence and want cookware that looks as good as it performs.
Check Current Price on Amazon →Banneton Proofing Basket Round 9 Inch Set of 2
Best for: New sourdough bakers who want to try different loaf sizes
This two-basket set includes one 9-inch round banneton perfect for standard sourdough loaves. The natural rattan construction allows proper air circulation while the flour-sack linen lining prevents sticking without requiring maintenance. Two baskets let you proof backup loaves or experiment with different shapes. At an affordable price point, this set removes the guesswork from final shaping and proofing, improving your success rate immediately.
Check Current Price on Amazon →Start Your Cinnamon Raisin Sourdough Journey Today
Baking cinnamon raisin sourdough is absolutely achievable for home bakers at any experience level. The recipe follows the same fundamentals as plain sourdough—long fermentation, careful shaping, and proper baking technique—with the addition of warm spices and chewy raisins that transform each slice into something special. The key is patience: rushing the fermentation stages sacrifices the depth of flavor that makes sourdough worth the effort. Start with quality equipment (particularly a Dutch oven for steam control and a reliable scale for measurements), follow the timing guidelines patiently, and don’t be discouraged if your first loaf isn’t perfect. Each bake teaches you something about your kitchen’s temperature, your starter’s temperament, and your personal baking style.
The beauty of sourdough is that it rewards consistency and attention but forgives minor mistakes. If your loaf doesn’t have perfect oven spring or the cinnamon swirl isn’t perfectly even, it will still taste delicious with complex, tangy flavor that commercial bread never achieves. Stock your kitchen with the essential tools we’ve recommended, measure your ingredients by weight, and commit to the full timeline. Within two or three bakes, you’ll develop the intuition that separates struggling bakers from confident ones. Welcome to the world of sourdough—your kitchen is about to smell absolutely incredible.
Frequently Asked Questions
Can I skip the overnight cold proof and bake the same day?
You can, but you’ll sacrifice flavor complexity. The long cold fermentation develops the distinctive tangy taste that makes sourdough special. If pressed for time, reduce the cold proof to 4-6 hours at room temperature, but expect milder flavor and slightly less control over oven spring.
How do I know if my sourdough starter is ready to use?
Your starter should be fed 4-8 hours before mixing and should double in volume, smell pleasantly sour, and have visible bubbles throughout. If you feed it in the morning and want to bake that evening, it’s usually ready by afternoon. A float test—dropping a spoonful in water to see if it floats—confirms readiness.
Why did my cinnamon raisins sink to the bottom during baking?
This happens when too much cinnamon-sugar paste is added or when it’s not distributed evenly. Use the exact amounts specified, sprinkle the cinnamon-sugar mixture lightly across the entire surface, and distribute raisins evenly before rolling. If dough is too wet, the filling becomes heavy and sinks.
What’s the difference between Dutch oven styles, and does it matter for sourdough?
Round cocottes and oval French ovens work equally well for sourdough. Round shapes work better for round boules, while oval fits oval batards. The key is adequate height (at least 3 inches) and a heavy lid that seals steam inside. Material quality (enameled cast iron) matters far more than exact shape.
Can I freeze shaped dough instead of cold proofing in the fridge?
Yes. Freeze for up to 3 months in the banneton, sealed in a freezer bag. When ready to bake, place the frozen loaf directly into the preheated Dutch oven—no thawing needed. Add 5-10 minutes to the covered baking time since the dough starts from frozen. Freezing is a convenient option for batch baking.
As an Amazon Associate, Build & Bloom earns from qualifying purchases. We only recommend products we genuinely think are useful. Prices and availability vary; check Amazon for the latest.
Leave a Reply