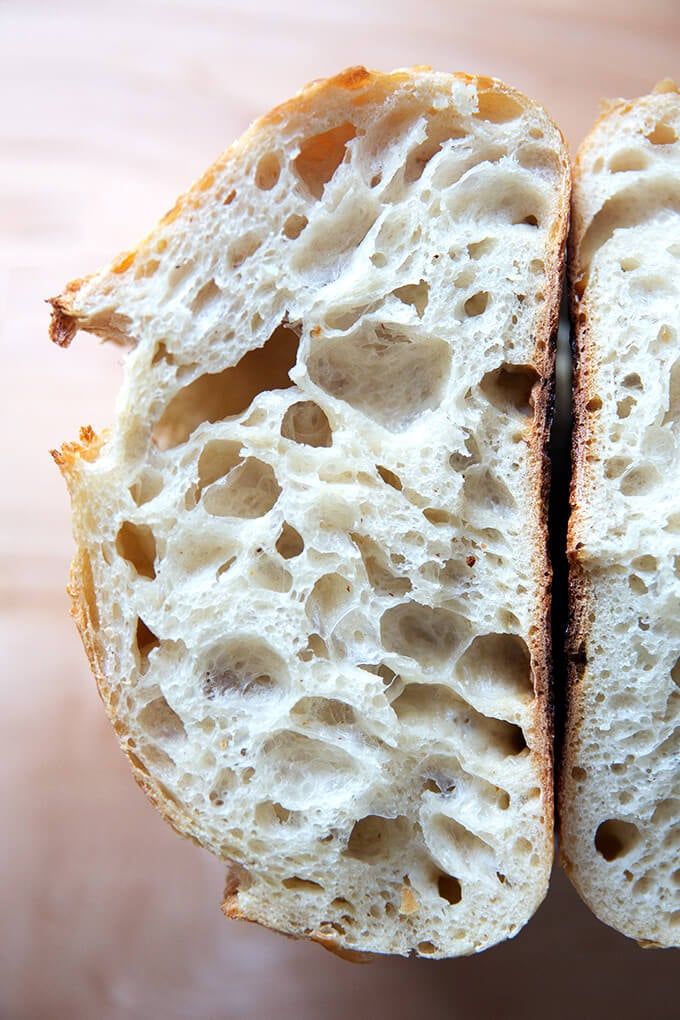

Making sourdough bread at home seems intimidating, but the truth is simpler than you think. You don’t need special equipment or mysterious techniques–just flour, water, salt, and patience. The real magic happens when wild yeast and bacteria in your starter naturally ferment the dough, creating that distinctive tangy flavor and chewy crumb that makes homemade sourdough so irresistible. Whether you’re a complete beginner or someone who’s tried baking before, this step-by-step guide will walk you through the entire process and show you exactly what to expect at each stage.
How to Make Homemade Sourdough Bread
Sourdough baking involves two main days: the mixing and bulk fermentation day, followed by shaping and overnight cold proofing, then baking. This method is forgiving and works beautifully in home kitchens.
Ingredients
- Active sourdough starter (100g, fed 4-8 hours before baking)
- Bread flour or all-purpose flour (500g)
- Water (350g, room temperature)
- Salt (10g)
- Additional flour for dusting (for handling dough)
Method
Mix Your Dough
Combine your fed starter with water in a large mixing bowl, stirring until mostly dissolved. Add flour and mix by hand or with a wooden spoon until all flour is hydrated and no dry bits remain. The dough will look shaggy and rough–this is correct. Let this mixture rest (called the autolyse) for 30 minutes to an hour at room temperature.
Add Salt and Develop Gluten
Sprinkle salt over the rested dough and incorporate it thoroughly by pinching and folding the dough. Over the next 30 minutes, perform a series of stretch-and-folds: wet your hand, grab one side of the dough, stretch it up and fold it over the center, rotate the bowl, and repeat from each direction. Do this 4-5 times over 30 minutes. Your dough should feel noticeably firmer and more cohesive.
Begin Bulk Fermentation
Cover your bowl and let the dough rest at room temperature (68-75 degrees Fahrenheit is ideal). Perform one more set of stretch-and-folds after 30 minutes, then let it ferment undisturbed for 3-4 more hours. You’re looking for the dough to increase in volume by about 50-75%, with visible bubbles on the surface and sides. It should feel airy but still hold its shape.
Pre-Shape and Rest
Gently turn your fermented dough out onto a lightly floured work surface. Using a bench scraper, carefully fold the dough into a round shape without deflating it too much. Let this pre-shaped round rest uncovered for 20-30 minutes. This short rest allows the gluten to relax and makes final shaping easier.
Final Shape and Cold Proof
Flip your dough so the smooth side faces down on the work surface. Fold it in half toward you, then roll it away from you, creating tension on the surface. This technique gives your loaf structure and helps it rise up rather than spread out. Place seam-side up in a floured proofing basket or bowl lined with a towel. Cover and refrigerate overnight (12-18 hours) or up to 48 hours. Cold fermentation develops flavor and makes scoring easier.
Score and Prepare for Baking
About 30 minutes before baking, preheat your oven to 450 degrees Fahrenheit with a heavy covered pot inside. This pot will trap steam around your bread as it bakes, creating the distinctive crispy crust. Remove your dough from the refrigerator and carefully turn it onto a piece of parchment paper. Using a sharp blade or bread lame, make a confident cut (called a score) about one-quarter inch deep at a 30-45 degree angle across the top.
Bake with Steam
Carefully place the parchment with your shaped dough into the preheated pot, cover with the lid, and bake for 20 minutes. This initial covered phase steams your bread. Remove the lid and bake for another 25-35 minutes until the crust is deep golden brown and the loaf sounds hollow when tapped on the bottom.
Cool Before Slicing
Remove your bread from the oven and let it cool on a wire rack for at least one hour before slicing. This cooling period allows the interior to set properly. If you slice too early, the crumb will be gummy. Fully cooled bread can be stored in a paper bag at room temperature for 3-4 days.
- Keep a thermometer handy: dough temperature matters more than room temperature. Aim for a final dough temperature of 75-78 degrees Fahrenheit for predictable fermentation timing.
- Trust the poke test over the clock: gently poke your fermented dough with a floured finger. If the indent springs back slowly and partially, you’re ready to shape. If it springs back quickly, ferment longer.
- Your sourdough starter must be truly active before you bake. It should double in size within 4-8 hours of feeding and smell pleasantly sour and slightly boozy. A weak starter leads to dense, gummy bread.
Essential Equipment for Sourdough Baking
- Dutch Oven or Covered Baking Vessel: The single most important tool for home sourdough baking. A covered pot traps steam around the dough, creating the signature crispy, caramelized crust while keeping the interior moist and open-crumbed. Look for heavy-bottomed options that retain heat well.
- Proofing Basket or Banneton: A specialized bowl that supports your shaped dough during cold fermentation. The floured surface prevents sticking and the sloped sides help your loaf maintain its round shape. You can substitute a regular bowl lined with a floured kitchen towel if needed.
- Bread Lame or Sharp Knife: A scoring tool makes clean, deliberate cuts in the dough surface before baking. This controls where the bread expands and creates the attractive ear pattern. A clean utility knife works if you don’t have a dedicated lame.
- Kitchen Scale: Sourdough baking relies on precise ingredient ratios rather than volume measurements. A digital scale measuring in grams ensures consistency and reproducible results from bake to bake.
Le Creuset Enameled Cast Iron Dutch Oven
Best for: Serious home bakers who want a lifetime investment
The gold standard for sourdough baking. Le Creuset’s enameled cast iron Dutch oven distributes heat evenly, retains temperature exceptionally well, and the enamel coating prevents rust and eliminates seasoning maintenance. The 5.5-quart capacity is perfect for a standard sourdough loaf. Available in multiple colors, this is a beautiful piece that works equally well for braising and everyday cooking.
Check Current Price on Amazon →Tramontina Enameled Cast Iron Dutch Oven
Best for: Budget-conscious beginners testing the sourdough method
Tramontina delivers excellent performance at a fraction of the price. This enameled cast iron Dutch oven heats well and maintains temperature reliably, making it ideal for your first sourdough loaves. While not as heavy-duty as premium brands, it’s proven itself with countless home bakers. A smart choice if you’re unsure about committing to expensive equipment.
Check Current Price on Amazon →Pyrex Glass Proofing Bowl with Lid
Best for: New bakers who want to monitor fermentation visually
A versatile glass mixing and proofing bowl that lets you see your dough’s progress without lifting the lid. The included plastic lid keeps your dough moist during bulk fermentation and cold proofing. Pyrex glass is durable, dishwasher safe, and works equally well for other baking projects. Clear sides mean you can watch for bubbles and judge doneness accurately.
Check Current Price on Amazon →Banneton Oval Proofing Basket (Rattan)
Best for: Bakers seeking authentic proofing baskets without premium pricing
This traditional rattan banneton features a natural spiral pattern that creates beautiful scoring on your loaf bottom, plus the texture prevents sticking without extra flour. The oval shape accommodates longer boule shapes. Includes a linen liner to reduce sticking further. At a mid-range price point, it offers professional results without the premium cost.
Check Current Price on Amazon →Start Your Sourdough Journey Today
Making sourdough bread at home is genuinely achievable with no special talent or mysterious knowledge. You simply need an active starter, quality flour, patience, and the right equipment. This guide walks you through every step so you understand what’s happening and why. Your first loaf might not be perfect, and that’s completely normal–even experienced bakers iterate on their technique. Each bake teaches you something new about how your kitchen’s temperature, humidity, and your starter’s behavior affect the final result.
The investment in a good Dutch oven pays dividends because you’ll use it for sourdough, braising, roasting, and everyday cooking. Pair it with a simple scale and banneton, and you have everything needed to produce bakery-quality loaves at home. The real reward isn’t bragging rights (though fresh sourdough definitely earns those)–it’s the smell of baking bread filling your house and that first bite of still-warm loaf with its crackling crust and soft, tangy interior. That moment of biting into something you made entirely from scratch is what keeps home bakers coming back to their kitchens again and again.
Frequently Asked Questions
How do I know if my sourdough starter is ready to use for baking?
Your starter should double in size within 4-8 hours of feeding and pass the float test: a small spoonful should float in water if it’s truly active. It should smell pleasantly sour and boozy, not musty or acetone-like. If it takes longer than 12 hours to double, feed it daily for a week to build strength.
Can I make sourdough in a warm kitchen versus a cool one?
Yes, temperature drastically affects fermentation speed. Warmer kitchens (75+ degrees) ferment faster, sometimes requiring bulk fermentation of only 3-4 hours. Cooler kitchens (65-70 degrees) take longer but develop deeper flavor. Cold proofing in the refrigerator essentially pauses fermentation, so you can work around your schedule.
What causes a dense, gummy crumb instead of open holes?
The most common causes are under-fermentation (not enough time for gas development), insufficient gluten development (skip the stretch-and-folds), or slicing the bread while still warm. Always cool completely before slicing, and trust the visual cues of your dough rather than strict timing.
Do I need a Dutch oven, or can I bake sourdough without one?
A Dutch oven creates steam that’s essential for the crispy crust, but you can approximate it by placing a baking pan on the bottom rack of your oven and pouring boiling water into it before adding your loaf. However, a proper Dutch oven produces superior results consistently.
How long can I keep my sourdough in the refrigerator before baking?
Cold fermentation in the refrigerator can extend from 12 hours to 48 hours without significantly harming your loaf. Beyond 48 hours, the dough can become over-fermented and lose structure. Longer fermentation does develop more complex flavor, so longer isn’t always better if it compromises the final rise.
As an Amazon Associate, Build & Bloom earns from qualifying purchases. We only recommend products we genuinely think are useful. Prices and availability vary; check Amazon for the latest.
Leave a Reply