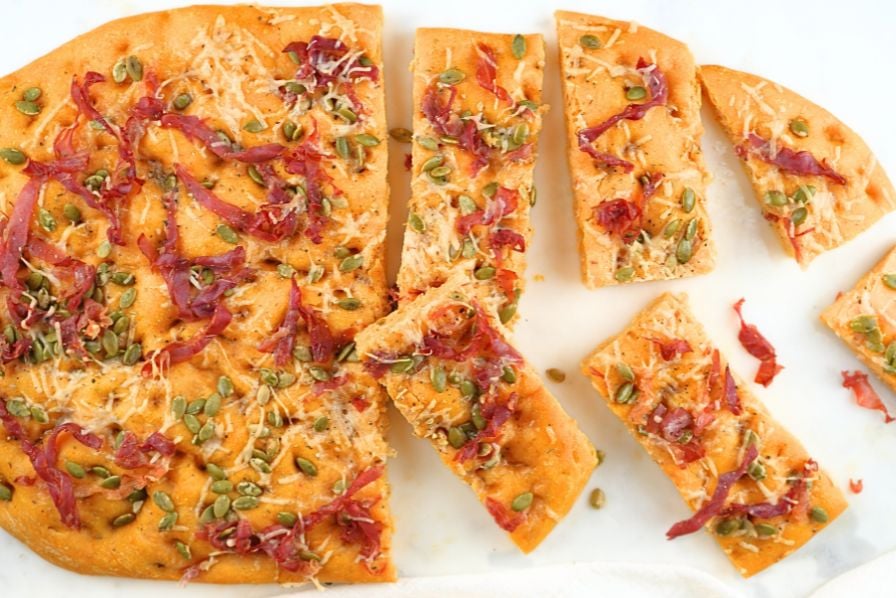

If you’ve mastered basic sourdough but want to explore seasonal flavors, pumpkin sourdough focaccia opens up a whole new world of possibilities. This recipe combines the tangy complexity of sourdough with the subtle earthiness of pumpkin puree and the salty richness of crispy prosciutto. The result is a show-stopping bread that works equally well as an appetizer, side dish, or savory snack. With proper timing and technique, you’ll produce a focaccia with a tender crumb and crispy, dimpled crust that rivals any bakery.
How to Make Pumpkin Sourdough Focaccia with Prosciutto
This focaccia uses an active sourdough starter and takes advantage of long, cold fermentation to develop flavor. Plan for about 24-48 hours from start to finish.
Ingredients
- 1 cup active sourdough starter (fed and bubbly)
- 3/4 cup pumpkin puree (canned or fresh)
- 1 1/2 cups warm water
- 3 1/2 cups bread flour or all-purpose flour
- 2 teaspoons salt
- 8-10 slices prosciutto, torn into pieces
- 3 tablespoons olive oil
- Coarse sea salt and fresh rosemary for topping
Method
Mix the dough
In a large mixing bowl, combine your active sourdough starter, pumpkin puree, and warm water. Stir until roughly combined. Add the flour and mix with your hands or a wooden spoon until all dry flour is incorporated and you have a shaggy dough. Cover the bowl and let it rest for 30 minutes (this is called autolyse).
Add salt and develop gluten
After the autolyse rest, sprinkle salt over the dough and incorporate it fully by folding and squeezing the dough in the bowl for 3-4 minutes. Perform a series of stretch-and-fold motions, pulling the dough from the edges toward the center, rotating the bowl as you go. Repeat this process every 30 minutes for the next 2-2.5 hours until the dough becomes smooth and elastic.
First rise and bulk fermentation
Allow the dough to rise at room temperature (around 70-75F) for 4-6 hours, or until it increases in volume by about 50 percent. You should see some bubbles on the surface and smell a pleasant sour aroma. The dough should be soft and jiggly but still hold some structure.
Cold retard overnight
Turn the dough out onto a lightly oiled sheet pan or into an oiled baking dish. Gently stretch it into a rectangle about 1/2 inch thick, being careful not to deflate it completely. Cover tightly with plastic wrap or a beeswax cloth and place in the refrigerator overnight (8-16 hours). This extended cold fermentation deepens the flavor and makes the dough easier to shape.
Shape and final proof
Remove the dough from the refrigerator and let it come to room temperature for 1-2 hours. Gently stretch it to fill your baking pan, creating an even thickness. Using your fingertips, create the characteristic dimples across the entire surface by pressing down gently but firmly, leaving small indentations.
Add toppings
Drizzle olive oil over the entire surface of the dough, letting it pool slightly in the dimples. Scatter torn prosciutto pieces evenly across the focaccia, pressing them gently into the dough. Sprinkle generously with coarse sea salt and fresh rosemary or dried Italian herbs. Let the focaccia rest for 30-45 minutes at room temperature before baking.
Bake until golden
Preheat your oven to 425F. Bake the focaccia for 20-25 minutes until the crust is deep golden brown and the prosciutto edges are crispy. The top should sound hollow when tapped. Remove from the oven and let cool on a wire rack for at least 10 minutes before slicing.
Cool and serve
Allow the focaccia to cool completely (or at least 30 minutes) before cutting. This allows the crumb structure to set properly. Serve at room temperature or warm, and store any leftovers in an airtight container for up to 3 days. It reheats beautifully wrapped in foil in a 350F oven for 10-15 minutes.
- Keep your sourdough starter at peak activity (fed 4-8 hours before mixing) for the most reliable rise and best flavor development throughout the long fermentation.
- If your kitchen is cold, the bulk fermentation and final proof may take longer. Use a kitchen thermometer to monitor dough temperature rather than clock time.
- For extra crispy prosciutto, lay it between paper towels and bake it separately at 400F for 8-10 minutes, then crumble it over the focaccia after baking for maximum texture contrast.
What to Look For in Sourdough Baking Equipment
- Sheet pans with consistent heat distribution: Quality commercial-grade sheet pans ensure even browning on your focaccia bottom without hot spots. Look for aluminum construction with rolled edges to prevent warping after repeated use in high-heat baking.
- Large mixing bowls with straight sides: Straight-sided bowls make it easier to perform stretch-and-fold motions and judge dough rise. Glass or stainless steel bowls that retain temperature are ideal for controlling fermentation.
- Bench scrapers and dough cutters: These tools help you handle sticky dough without adding excess flour, preserve gluten development, and create those signature focaccia dimples. Look for both metal and silicone options for different tasks.
- Kitchen thermometer for dough temperature: Sourdough success depends on dough temperature as much as time. An instant-read or digital thermometer lets you hit your target dough temperature and adjust fermentation timing accordingly.
Nordic Ware Natural Aluminum Commercial Sheet Pan
Best for: Home bakers needing professional-grade focaccia baking
These commercial-weight aluminum sheet pans are the gold standard for focaccia baking. The natural aluminum construction provides excellent, even heat distribution to prevent burnt bottoms and hot spots. The rolled edges prevent warping after repeated high-heat use. At 13×18 inches, they accommodate a full batch of focaccia with room for expansion. Nordic Ware’s reputation for durability means these pans will outlast dozens of loaves.
Check Current Price on Amazon →Pyrex 9×13 Glass Baking Dish
Best for: New sourdough bakers who want to see fermentation progress
Glass baking dishes let you monitor your dough’s rise without lifting the cover, eliminating guesswork. Pyrex’s borosilicate glass is heat-resistant and durable, and the 9×13 size works perfectly for a more compact focaccia. The straight sides make stretch-and-fold motions easier during bulk fermentation. Glass retains temperature slightly better than metal, which can help newer bakers achieve consistent results.
Check Current Price on Amazon →Winco Stainless Steel Mixing Bowl
Best for: Budget-conscious bakers needing reliable bulk fermentation vessels
Stainless steel mixing bowls are essential for sourdough work, and Winco offers commercial-quality construction at home-baker prices. The smooth interior makes it easy to perform stretch-and-fold motions and remove finished doughs. Stainless steel doesn’t retain flavors or odors and is virtually indestructible. This 8-quart capacity is large enough for substantial batches while remaining manageable.
Check Current Price on Amazon →OXO Good Grips Silicone Dough Scraper
Best for: Sourdough bakers performing daily stretch-and-fold work
This silicone dough scraper is gentler on developing gluten than metal scrapers while still providing excellent dough manipulation. The curved design fits comfortably in your hand and allows precise control during shaping and dimpling. Unlike metal, it won’t damage non-stick surfaces or bowl edges. OXO’s ergonomic handles reduce hand fatigue during extended baking sessions.
Check Current Price on Amazon →Final Recommendation
Pumpkin sourdough focaccia with prosciutto represents the next level of sourdough baking–it’s ambitious enough to feel special but manageable with proper planning and equipment. The beauty of this recipe is that it demonstrates all the fundamental sourdough techniques: starter maintenance, bulk fermentation, cold retard, and proper shaping. Once you master this seasonal variation, you’ll have the confidence to create endless focaccia combinations tailored to your tastes and pantry.
Successfully baking focaccia comes down to three factors: reliable fermentation vessels, accurate temperature monitoring, and a quality baking surface that distributes heat evenly. The Nordic Ware sheet pans, combined with the Thermoworks thermometer for dough temperature control, give you the foundation for consistent results. With your sourdough starter at peak activity and 24-48 hours of proper timing, you’ll produce a focaccia that impresses family and friends–proof that homestead baking has evolved far beyond basic loaves. Start this recipe this weekend, and celebrate fall with a focaccia that captures both the season and your sourdough expertise.
Frequently Asked Questions
Can I use canned pumpkin puree instead of fresh?
Absolutely. Canned pure pumpkin puree (not pumpkin pie filling) works perfectly and offers convenience without sacrificing flavor. Make sure it’s 100% pumpkin with no added spices or sugar. The proportion remains the same as fresh puree.
What if my sourdough starter isn’t doubling in the 4-6 hour window?
This is normal and depends heavily on your kitchen temperature. Cooler kitchens (under 70F) may need 6-8 hours for bulk fermentation. Watch for a 50% increase in volume and visible bubbles rather than targeting a specific time. You can extend the timeline or use the overnight cold retard to develop flavor regardless of bulk fermentation speed.
Can I freeze the shaped dough instead of cold proofing overnight?
Yes, absolutely. After shaping, wrap the focaccia tightly in plastic wrap and freeze for up to 2 weeks. When ready to bake, remove from the freezer, add toppings, and let it come to room temperature (2-3 hours) before baking. This is actually ideal for batch baking.
Why isn’t my focaccia getting crispy on the bottom?
Your oven temperature may be too low or your pan may not be heating properly. Preheat your sheet pan in a 450F oven for 10 minutes before placing the shaped dough on it. This jump-starts bottom browning. Also verify your oven temperature with an oven thermometer to ensure it matches your dial.
How do I know when my sourdough starter is active and ready to use?
An active starter should double in size within 4-8 hours of feeding (depending on room temperature) and smell pleasantly sour with visible bubbles throughout. Use it at peak rise just before it starts to collapse. A clear test: it should float a small spoon or be bubbly enough that it easily holds a spoonful of flour.
As an Amazon Associate, Build & Bloom earns from qualifying purchases. We only recommend products we genuinely think are useful. Prices and availability vary; check Amazon for the latest.
Leave a Reply