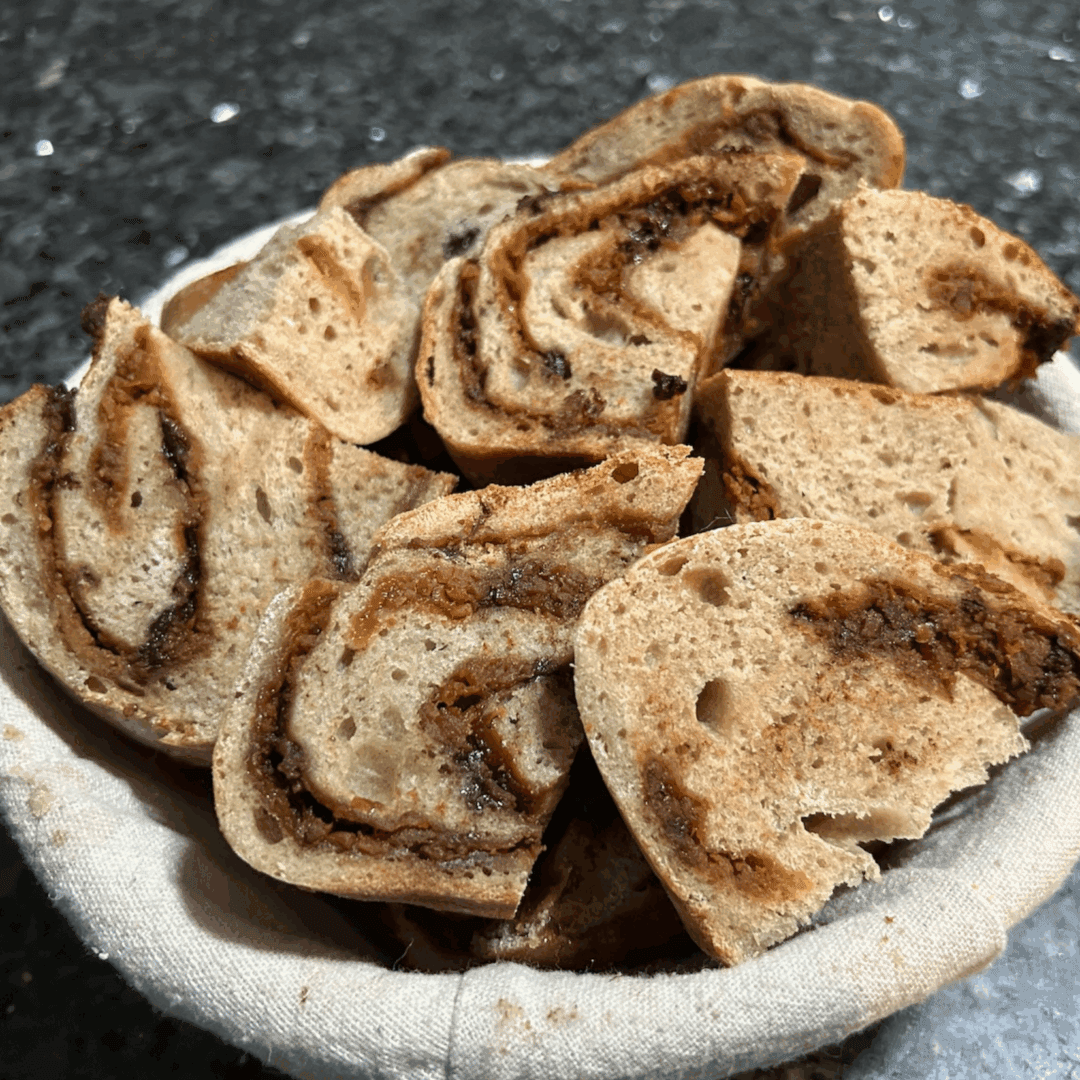

If you’ve scrolled past pumpkin spice sourdough pins all fall season, you’re about to stop scrolling and start baking. This recipe bridges the gap between tangy sourdough and cozy autumn flavors, creating a loaf that’s simultaneously impressive and surprisingly approachable for home bakers. The key is understanding how pumpkin puree affects your dough hydration and fermentation timing, which we’ll walk you through step by step.
How to Bake Pumpkin Spice Swirl Sourdough
This recipe combines a classic sourdough base with pumpkin puree and warm spices, then swirls in cinnamon and sugar for visual appeal and flavor complexity. Total time is approximately 24 hours from mixing to slicing.
Ingredients
- 500g bread flour (or all-purpose)
- 350ml water, divided
- 100ml pumpkin puree (canned or fresh, not pie filling)
- 100g active sourdough starter (fed 4-8 hours prior)
- 10g salt
- Pumpkin pie spice blend (cinnamon, nutmeg, ginger, cloves): 2 teaspoons total
- Filling: 3 tablespoons cinnamon sugar mixture
Method
Mix your dough base
In a large bowl, combine your pumpkin puree with 250ml of water and stir until smooth. Add your active sourdough starter and mix thoroughly, breaking up any clumps. Fold in the flour, using your fingers to ensure all flour is hydrated. Cover and let rest for 30 minutes (autolyse phase).
Incorporate salt and spices
After the rest, sprinkle salt and pumpkin pie spice over the dough. Wet your hands slightly and massage the salt and spices into the dough, combining the remaining 100ml of water gradually as you work. The dough should feel slightly tacky but manageable. This usually takes 5-10 minutes of hand mixing.
Bulk fermentation with stretch-and-folds
Place dough in a lightly oiled container. Over the next 4-5 hours, perform four sets of stretch-and-folds at 30-minute intervals. Wet your hand, grab one side of the dough, stretch it up and fold it over the center, rotate the bowl 90 degrees, and repeat. This builds strength without aggressive kneading. Between folds, let the dough rest covered at room temperature.
Shape and fill your loaf
When the dough is puffy and jiggles slightly when the bowl is moved, turn it onto a lightly floured surface. Gently shape it into a rough rectangle about 10 inches by 6 inches. Sprinkle your cinnamon sugar mixture evenly across the surface, leaving a half-inch border. Roll the dough tightly toward you, sealing the seam with the heel of your hand. Form into a round by tucking the seam underneath.
Cold proof overnight
Place your shaped dough seam-side up in a banneton basket or bowl lined with a floured cloth. Cover with plastic or place inside a plastic bag. Refrigerate for 12-16 hours. This slow fermentation develops flavor and makes scoring easier. The dough should feel cool and slightly less puffy than it would at room temperature.
Score and prepare to bake
Remove dough from the refrigerator 30 minutes before baking. Preheat your oven with a Dutch oven inside to 475 degrees Fahrenheit. Carefully flip the dough onto a piece of parchment paper. Using a sharp blade or bread lame, score the top with a decisive 1/4-inch deep cut at a 30-degree angle across the top.
Bake in the Dutch oven
Carefully transfer the parchment and dough into the preheated Dutch oven. Cover with the lid and bake for 20 minutes to trap steam. Remove the lid and bake an additional 25-30 minutes until the crust is deep golden brown. The internal temperature should reach 205-210 degrees Fahrenheit when measured in the thickest part.
Cool completely before slicing
Transfer the loaf to a wire rack and let it cool for at least 2-3 hours before slicing. This allows the crumb structure to set properly. Slicing too early results in a gummy interior. Once cooled, your loaf will have a crispy crust and complex pumpkin-spice flavor throughout with swirls of cinnamon sugar.
- Use freshly fed starter that’s at peak activity (doubled in size with a dome shape) for best fermentation. Starter temperature significantly affects timeline–warmer kitchens will ferment faster.
- The pumpkin puree adds moisture, so don’t add extra water if your dough feels wetter than typical sourdough. Trust the recipe ratios.
- If you notice the dough doubling very quickly during bulk ferment (under 3 hours), move it to the refrigerator early to prevent over-fermentation and loss of oven spring.
What to Look For in Sourdough Baking Equipment
- Dutch Oven Size and Material: Choose a 5-7 quart enameled cast iron Dutch oven. The enclosed environment traps steam during the initial bake phase, creating the signature crispy crust. Ensure the lid fits snugly and the enamel coating is chip-free.
- Banneton Basket Shape: A round banneton (9-10 inch diameter) works best for this boule-shaped loaf. Look for naturally woven rattan or cane with a sturdy rim. Avoid overly smooth surfaces that prevent dough grip during proofing.
- Scoring Tool Sharpness: A dedicated bread lame or single-edge razor blade creates cleaner scores than kitchen knives. A sharp tool cuts without dragging, which helps the loaf expand upward rather than sideways during oven spring.
- Thermometer Accuracy: An instant-read meat thermometer with at least a 1-inch probe accurately measures internal dough temperature. This removes guesswork from doneness and prevents under or over-baking.
Staub 5.5-Quart Round Cocotte Dutch Oven
Best for: Home sourdough bakers seeking professional results
Staub’s enameled cast iron is engineered specifically for bread baking, with tight-fitting lids that trap steam effectively. The dark interior enamel makes it easy to monitor browning, and the cast iron conducts heat evenly for consistent crust development. Available in classic black and seasonal colors. This is the workhorse for serious sourdough bakers and will last decades with proper care.
Check Current Price on Amazon →Lodge Enameled Cast Iron Dutch Oven 5.5 Quart
Best for: Budget-conscious beginners
Lodge delivers reliable cast iron performance at half the price of premium brands. The 5.5-quart capacity is ideal for standard sourdough loaves, and the red enamel interior is durable and easy to clean. While the lid fit is slightly looser than high-end options, it still traps adequate steam for quality crust development. A solid entry-point option that performs well for years.
Check Current Price on Amazon →Artisan Boule Banneton Basket 10 Inch
Best for: First-time sourdough shapers
This naturally woven rattan banneton features a deep boule shape perfect for pumpkin spice sourdough. The tight weave prevents dough from sticking while allowing proper grip during fermentation. Includes a cloth liner to protect the basket and extend its life. The 10-inch diameter accommodates standard 500-gram doughs without crowding, making it forgiving for beginners still refining their shaping technique.
Check Current Price on Amazon →Le Creuset Enameled Cast Iron Round Dutch Oven 5.5-Quart
Best for: Collectors and serious home bakers
Le Creuset represents the pinnacle of enameled cast iron craftsmanship, with heritage dating back decades. The thick cast iron walls distribute heat with exceptional evenness, resulting in perfectly caramelized crusts. Available in dozens of colors beyond standard black and red. The tight-fitting lid and superior enamel finish justify the premium price for bakers who bake weekly and expect equipment to become family heirlooms.
Check Current Price on Amazon →Start Baking Your Pumpkin Spice Sourdough Today
The pumpkin spice swirl sourdough combines classic sourdough technique with fall flavors in a way that impresses family and friends. The 24-hour timeline fits naturally into most routines: mix and bulk ferment during the day, cold proof overnight, then bake the next morning for fresh bread by lunchtime. Understanding the impact of pumpkin puree on hydration and fermentation is the real skill here, and this recipe walks you through it clearly.
Invest in one quality Dutch oven and a banneton basket and you’ll have the core equipment for years of successful sourdough baking. The tools matter because they directly affect steam management and dough support, which determine whether your loaf has a crispy, caramelized crust and an open, tender crumb. Start with this recipe, dial in your timeline based on your kitchen temperature, and you’ll be making beautiful swirled loaves by fall’s end.
Frequently Asked Questions
Can I use canned pumpkin pie filling instead of plain pumpkin puree?
No. Pie filling contains added sugar and spices that will make your dough overly sweet and throw off fermentation timing. Use unsweetened pure pumpkin puree only, then add your own spice blend for better flavor control.
What if my sourdough starter isn’t very active?
A weak starter will extend fermentation significantly. Feed your starter 2-3 times daily for 3-5 days before baking to build strength. The starter should double reliably within 4-6 hours of feeding before you attempt this recipe.
Can I skip the cold proof and bake the same day?
Yes, but expect less developed flavor. After shaping, let the dough proof at room temperature for 4-6 hours until puffed, then bake. Cold proofing develops deeper flavor and makes the dough easier to score, so it’s worth the extra time if possible.
How do I store the finished loaf?
Keep the cooled loaf in a breathable cloth bag or paper bag at room temperature for up to 4 days. For longer storage, slice first, then freeze in an airtight container for up to 2 months. Toast from frozen as needed.
Why is my crumb dense instead of open?
Dense crumb usually means under-fermentation. Extend bulk fermentation by 30-60 minutes next time, watching for a dough that jiggles gently and passes the poke test (indentation slowly springs back halfway). Pumpkin puree ferments more slowly than plain dough, so patience is essential.
As an Amazon Associate, Build & Bloom earns from qualifying purchases. We only recommend products we genuinely think are useful. Prices and availability vary; check Amazon for the latest.
Leave a Reply