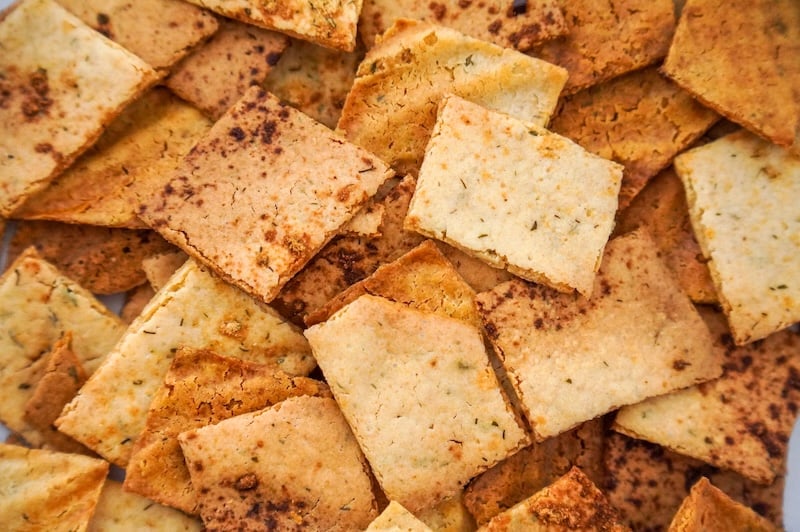

If you keep a sourdough starter, you know the monthly feeding ritual produces more discard than you can reasonably use. Instead of tossing it out or making the same old pancakes, try converting that starter into savory crackers that rival store-bought options at a fraction of the cost. Ranch-flavored sourdough crackers are crispy, addictive, and transform kitchen waste into something your family will actually request.
How to Make Ranch Sourdough Discard Crackers
This recipe uses sourdough starter discard that would otherwise go to waste, turning it into crunchy crackers with bold ranch flavoring in under an hour.
Ingredients
- 1 cup sourdough starter discard (unfed, room temperature)
- 3/4 cup all-purpose flour
- 1/4 cup olive oil
- 2 tablespoons dry ranch seasoning mix
- 1/2 teaspoon sea salt for topping
- Water as needed (1-2 tablespoons)
Method
Mix the dough base
Combine sourdough discard, flour, and olive oil in a mixing bowl, stirring until roughly combined. The mixture will be shaggy and dense. Add 1 tablespoon of water if the mixture seems too dry to come together; the dough should hold together without being sticky.
Incorporate the seasonings
Sprinkle the dry ranch seasoning over the dough mixture and knead by hand for 2-3 minutes until the seasoning is evenly distributed throughout and the dough becomes more cohesive. You should be able to press it into a ball without it falling apart.
Prepare your work surface
Lightly flour a clean counter or large cutting board. Place a sheet of parchment paper on top and flour it as well. This prevents sticking and makes transfer to the oven easier.
Roll out the dough thin
Transfer your dough ball onto the prepared surface and use a rolling pin to flatten it into a thin, even layer about 1/8 inch thick. Work methodically from the center outward. If the dough springs back, let it rest for 2 minutes and continue rolling.
Cut into cracker pieces
Using a pizza cutter or sharp knife, score the dough into 1-2 inch squares or rectangles. Don’t separate them yet; just mark the lines. Sprinkle the top lightly with additional sea salt if desired. You can also prick each piece with a fork to prevent puffing.
Bake until crispy
Transfer the parchment and dough to a baking sheet. Bake at 375°F for 12-18 minutes, checking at the 12-minute mark. The crackers are done when they’re golden brown and feel completely crisp when touched. Edges may brown faster than the center, so rotate the pan halfway through if needed.
Cool and break apart
Remove from the oven and let the cracker sheet rest on the baking sheet for 2 minutes. Use the pre-cut lines to break the crackers apart, then transfer them to a cooling rack or paper towel. They’ll continue to crisp as they cool.
Store for freshness
Once completely cooled, store crackers in an airtight container at room temperature for up to 5 days. For extended storage, freeze in freezer bags for up to 3 weeks and reheat briefly in a 300°F oven to restore crispness.
- Don’t use freshly fed sourdough starter; discard from the top of an unfed starter produces better texture because it has less active yeast and won’t over-puff in the oven.
- Roll the dough between two sheets of parchment paper for easier cleanup and to prevent flour buildup that can make crackers gritty.
- If your crackers turn out chewy instead of crispy, your oven may run cool; increase temperature to 400°F and reduce baking time by 2-3 minutes on the next batch.
What to Look For in Cracker-Making Equipment
- Rolling pin quality and material: A smooth, weighted rolling pin distributes pressure evenly and prevents dough from sticking. Marble or stainless steel surfaces are ideal for working with sticky dough like sourdough starter.
- Baking sheet thickness and heat distribution: Thicker, heavier baking sheets prevent warping and ensure even browning. Look for sheets with a light color surface to avoid excessive bottom browning of delicate crackers.
- Cutting tools for precision: A sharp pizza cutter or pastry wheel creates clean edges without dragging dough. Straight edges are easier to score than wavy ones for uniform cracker sizes.
- Parchment paper quality: Quality parchment withstands high heat without curling or tearing, preventing your crackers from sticking and breaking apart unevenly during baking.
OXO Good Grips Marble Rolling Pin
Best for: Dough work with sourdough and sticky batters
This weighted marble rolling pin provides consistent, even pressure distribution without sticking. The cool marble surface naturally resists dough adhesion, making it perfect for thin, delicate work like cracker dough. The soft ergonomic handles reduce hand fatigue during the rolling process, and the pin’s weight does much of the work for you. Marble is food-safe, easy to clean, and maintains its smooth surface for years of use.
Check Current Price on Amazon →Wilton Aluminum Nonstick Pizza Cutter
Best for: Quick, clean cracker cutting
A sharp wheel design cuts through thin dough cleanly without dragging or tearing. The aluminum construction is lightweight yet durable, and the nonstick surface prevents dough buildup. At a budget-friendly price point, this tool delivers professional-quality cuts. The ergonomic handle provides good control when scoring dough into uniform cracker pieces.
Check Current Price on Amazon →Pyrex Basics Oblong Baking Dish Set
Best for: Even baking with reliable heat distribution
Glass baking dishes heat slowly and distribute warmth evenly, reducing the risk of burnt edges on crackers. Pyrex is durable, oven-safe to 500°F, and the light color surface helps prevent over-browning. These rectangular dishes are ideal for cracker sheets, and the set provides multiple sizes. Glass also won’t react with acidic sourdough starter, keeping your crackers’ flavor pure.
Check Current Price on Amazon →USA Pan Half Sheet Baking Pan
Best for: Professional cracker baking results
Manufactured from aluminized steel with a commercial-grade nonstick coating, USA Pan sheets are designed for bakeries and serious home bakers. The corrugated rim prevents warping, ensuring flat, even crackers every time. The steel conducts heat efficiently while the nonstick surface releases your crackers cleanly. These pans last for decades and perform consistently across multiple batches.
Check Current Price on Amazon →Final Recommendation
Ranch sourdough discard crackers represent the perfect bridge between waste reduction and homemade snacking. They’re faster than most bread projects, require no special ingredients beyond what you already have, and deliver satisfying results even on your first attempt. The investment in a quality rolling pin and baking sheet pays dividends across all your baking projects, not just crackers.
Start with budget-friendly tools and upgrade as you find what works best for your kitchen style. Whether you choose professional commercial sheets or beautiful heirloom cast iron, the real magic happens when you transform that starter discard into something your household actually enjoys eating. Once you master the basic recipe, seasoning variations will follow naturally, turning each batch into an experiment in flavor.
Frequently Asked Questions
Can I use actively fed sourdough starter instead of discard?
You can, but unfed discard works better because it has less active yeast, which prevents over-puffing and yields crispier crackers. If using fed starter, reduce baking time by 2-3 minutes and watch carefully to prevent burning.
What if my crackers came out chewy instead of crispy?
Chewy crackers indicate insufficient baking time or oven temperature running cool. Increase your oven temperature to 400°F, bake for 14-20 minutes, and remove when fully golden. Store cooled crackers in an airtight container; humidity will soften them over time.
Can I customize the seasoning beyond ranch?
Absolutely. Try Italian seasoning, garlic powder, everything bagel seasoning, or jalapeno cheddar. Use 2 tablespoons of any dry seasoning blend and adjust salt accordingly based on the blend’s sodium content.
How long do homemade sourdough crackers stay fresh?
Stored in an airtight container at room temperature, they last 5-7 days. For longer storage, freeze in freezer bags for up to 3 weeks and reheat briefly at 300°F to restore crispness.
Do I need to prick the dough before baking?
Pricking with a fork is optional but recommended. It prevents large air pockets from forming and helps create uniformly crispy crackers. Skip pricking if you prefer slightly thicker, airier crackers.
As an Amazon Associate, Build & Bloom earns from qualifying purchases. We only recommend products we genuinely think are useful. Prices and availability vary; check Amazon for the latest.
Leave a Reply