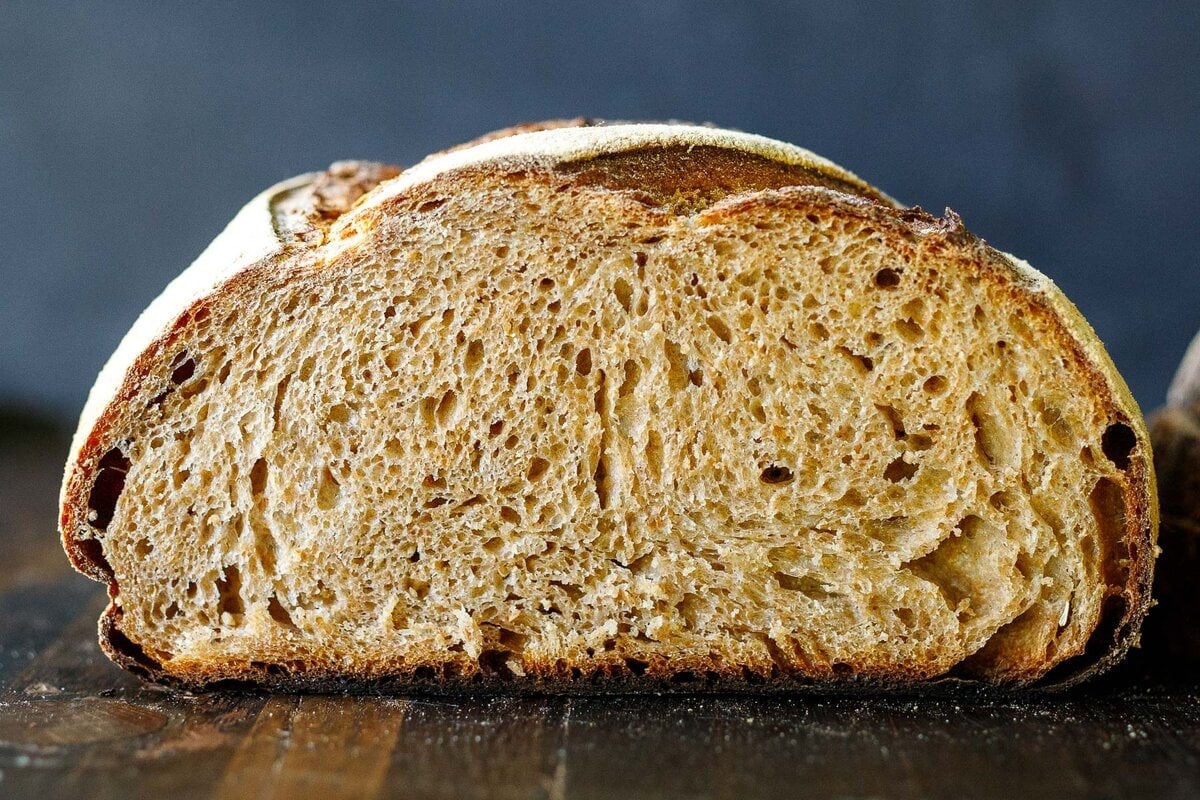

Making sourdough at home intimidates many bakers, but the process is actually straightforward once you understand the basic rhythm of mixing, fermenting, and baking. Unlike commercial yeast breads, sourdough relies on wild fermentation to develop complex flavor and a crackling crust. This guide breaks down the entire method into simple steps so you can bake bakery-quality loaves in your own kitchen.
How to Make Sourdough Bread from Scratch
This recipe yields one large artisan loaf with a crispy exterior and open, airy crumb. Total time from mixing to finished bread is approximately 12-16 hours, including overnight fermentation.
Ingredients
- 1 cup active sourdough starter (fed 4-8 hours prior, bubbly and doubled)
- 1.5 cups warm water (around 75-80°F)
- 3.5 cups bread flour or all-purpose flour
- 1.5 teaspoons sea salt
- Extra flour for dusting and shaping
Method
Combine ingredients
In a large mixing bowl, combine the active sourdough starter and warm water, stirring until the starter dissolves into the water. Add all the flour and mix with your hand or a wooden spoon until a shaggy dough forms with no dry flour remaining. Cover the bowl with a damp cloth and let rest for 30 minutes. This rest period, called autolyse, allows the flour to fully hydrate and develops gluten naturally.
Incorporate salt and perform stretch-and-folds
Sprinkle the salt over the dough and incorporate it by wetting your hand and folding the dough over itself repeatedly in the bowl, turning the bowl as you go. Perform a series of four stretch-and-fold cycles over the next two hours, spaced 30 minutes apart. Each fold increases gluten development and dough strength without aggressive kneading.
Bulk ferment at room temperature
After the final stretch-and-fold, allow the dough to bulk ferment at room temperature (68-75°F) for 4-6 hours. The dough should increase in volume by roughly 50-75%, look slightly puffy, and show visible bubbles when you peek under the surface. Fermentation time varies with temperature; warmer kitchens ferment faster than cool ones.
Pre-shape and bench rest
Turn the dough out onto a lightly floured surface and gently pre-shape it into a round by folding the edges toward the center. Let it rest on the bench for 20-30 minutes. This resting period relaxes the gluten and allows you to shape it more easily into a tight, structured boule.
Final shape and cold proof
With the smooth side facing down, fold the dough in thirds like an envelope, then roll it tightly toward you to create tension on the surface. Place it seam-side up in a banneton basket or a bowl lined with a well-floured cloth. Cover and refrigerate overnight for 8-12 hours, or up to 24 hours. Cold fermentation develops flavor and makes scoring easier.
Preheat oven and prepare baking vessel
Place a Dutch oven or covered baking vessel inside your oven and preheat to 500°F for at least 45 minutes. The intense, trapped heat mimics a professional bread oven and creates the steam necessary for an impressive oven spring and crispy crust.
Score and bake covered
Remove the Dutch oven from the hot oven and carefully turn the cold dough out onto parchment paper. Using a sharp blade or bread lame, score the top with a single diagonal slash or cross pattern about 1/4 inch deep. Place the dough (on parchment) into the hot Dutch oven, cover with the lid, and bake at 500°F for 20 minutes.
Finish baking uncovered
Remove the lid and reduce the oven temperature to 450°F. Bake for an additional 25-30 minutes until the crust is deep golden brown and the loaf sounds hollow when tapped on the bottom. Remove from the oven and cool on a wire rack for at least one hour before slicing, allowing the interior crumb structure to set.
- Keep a thermometer nearby to monitor dough temperature. Ideal dough temperature is 75-78°F; if your kitchen is cold, use slightly warmer water, and if warm, use cooler water.
- Your sourdough starter should be at peak activity (doubled in size with bubbles and a pleasant sour smell) before mixing. Feed it 4-8 hours before baking.
- Resist the urge to slice into the bread immediately. The crumb continues to set during cooling, and slicing too early results in a gummy interior.
Essential Equipment for Sourdough Baking
- Dutch oven or covered baker: A heavy, lidded vessel traps steam during the first phase of baking, creating the crispy crust and oven spring that make artisan sourdough distinctive. Cast iron or enameled ceramic work equally well.
- Banneton proofing basket: A shaped, floured basket supports the final cold fermentation and prevents the dough from spreading. Available in round or oval shapes to match your preferred loaf form.
- Bread lame or sharp scoring tool: A dedicated blade for scoring creates controlled slashes that direct oven spring and improve the bread’s appearance. A single razor blade also works, though a proper lame is safer to handle.
- Kitchen scale: Precise measurements by weight rather than volume produce consistent results. A scale also simplifies scaling recipes up or down without calculating conversions.
Staub 4-Quart Round Cocotte Dutch Oven
Best for: Serious home bakers wanting professional results
This enameled cast iron Dutch oven is specifically designed for bread baking with superior heat retention and steam circulation. The 4-quart capacity is ideal for a single large artisan loaf, and the heavy lid creates an intense, controlled baking environment. Staub’s matte black enamel interior prevents sticking, and the vessel transitions seamlessly from stovetop to oven. At this price point, you’re investing in decades of reliable use and exceptional bread.
Check Current Price on Amazon →Tramontina 5.5-Quart Enameled Cast Iron Dutch Oven
Best for: Beginners testing the process without big investment
Tramontina delivers authentic enameled cast iron performance at a fraction of premium prices. The 5.5-quart capacity handles sourdough loaves beautifully, and the heavy lid traps steam effectively. While the enamel finish is slightly more prone to chipping than Staub or Le Creuset, the core function remains excellent. This is the budget choice that doesn’t compromise on bread results.
Check Current Price on Amazon →Cuisinart 5.5-Quart Stainless Steel Dutch Oven
Best for: New bakers preferring easier maintenance
Stainless steel Dutch ovens offer a lighter alternative to cast iron while still delivering excellent steam retention for bread baking. Cuisinart’s version distributes heat evenly and is significantly easier to clean than enameled cast iron. The bright interior makes it simple to monitor your loaf through the glass lid during baking. It’s an underrated choice for sourdough bakers who prioritize convenience.
Check Current Price on Amazon →Le Creuset 3.5-Quart Enameled Cast Iron Round French Oven
Best for: Heritage collectors and kitchen showpieces
Le Creuset represents the gold standard of enameled cast iron, with hand-cast construction and lifetime durability. The iconic colorways (flame orange, cherry red, Caribbean blue) make this as much a statement piece as a functional baker. While compact at 3.5 quarts for smaller loaves, the superior craftsmanship and timeless design mean you’ll treasure this Dutch oven for generations.
Check Current Price on Amazon →Your Sourdough Journey Starts Here
Making sourdough at home is a learnable skill, not a mystery reserved for professional bakers. The basic rhythm of mixing, fermenting, shaping, and baking remains the same across every loaf you’ll make. What changes is your intuition: as you bake more, you’ll recognize the subtle cues of proper fermentation, develop feel for dough consistency, and understand how temperature and time affect your results. Your first loaf won’t be perfect, and that’s exactly as it should be. Each bake teaches you something.
Invest in a reliable Dutch oven and banneton basket, feed your starter consistently, and follow the method step-by-step. Keep detailed notes on fermentation times, oven temperature, and how the final loaf turned out. Within three to five bakes, you’ll produce bread that rivals your local bakery. Within a season, you’ll be the person your friends ask for sourdough advice. The journey from uncertainty to confidence is the real reward of home baking.
Frequently Asked Questions
What temperature should my sourdough starter be before I use it?
Your starter should be at peak activity: roughly doubled in size, with visible bubbles throughout and a pleasant sour aroma. Feed it 4-8 hours before mixing your dough, depending on room temperature and starter strength. A starter at peak is bubbly and slightly domed on top.
Can I use all-purpose flour instead of bread flour?
Yes, all-purpose flour works perfectly for sourdough and produces slightly softer crumbs. Bread flour, with its higher protein content, creates a chewier crumb and slightly higher rise. Either produces excellent bread; your preference determines the choice. Experiment with both to find your favorite texture.
How long can I keep my shaped dough in the refrigerator?
Cold fermentation can extend from 8 hours to 48 hours. Longer fermentation (24-36 hours) develops deeper flavor, while shorter periods (8-12 hours) offer convenience. Beyond 48 hours, the dough begins to over-ferment and may collapse during baking. Monitor your dough visually and bake when it feels slightly puffy, not rock-hard.
Why is my sourdough crust not crispy?
A soft crust usually signals insufficient steam during baking. Ensure your Dutch oven is fully preheated for at least 45 minutes and that the lid stays on for the first 20 minutes of baking. If your oven door loses heat when opening it, preheat an extra 10-15 minutes. A properly sealed, hot Dutch oven is essential for crispness.
What is hydration, and does it matter for my sourdough?
Hydration is the ratio of water to flour by weight (expressed as a percentage). This recipe is approximately 65% hydration, a moderate level that’s forgiving for beginners and produces excellent open crumb. Higher hydration (70-80%) creates more open, airy crumb but requires stronger technique. Start here and adjust based on your dough’s feel and final texture.
As an Amazon Associate, Build & Bloom earns from qualifying purchases. We only recommend products we genuinely think are useful. Prices and availability vary; check Amazon for the latest.
Leave a Reply