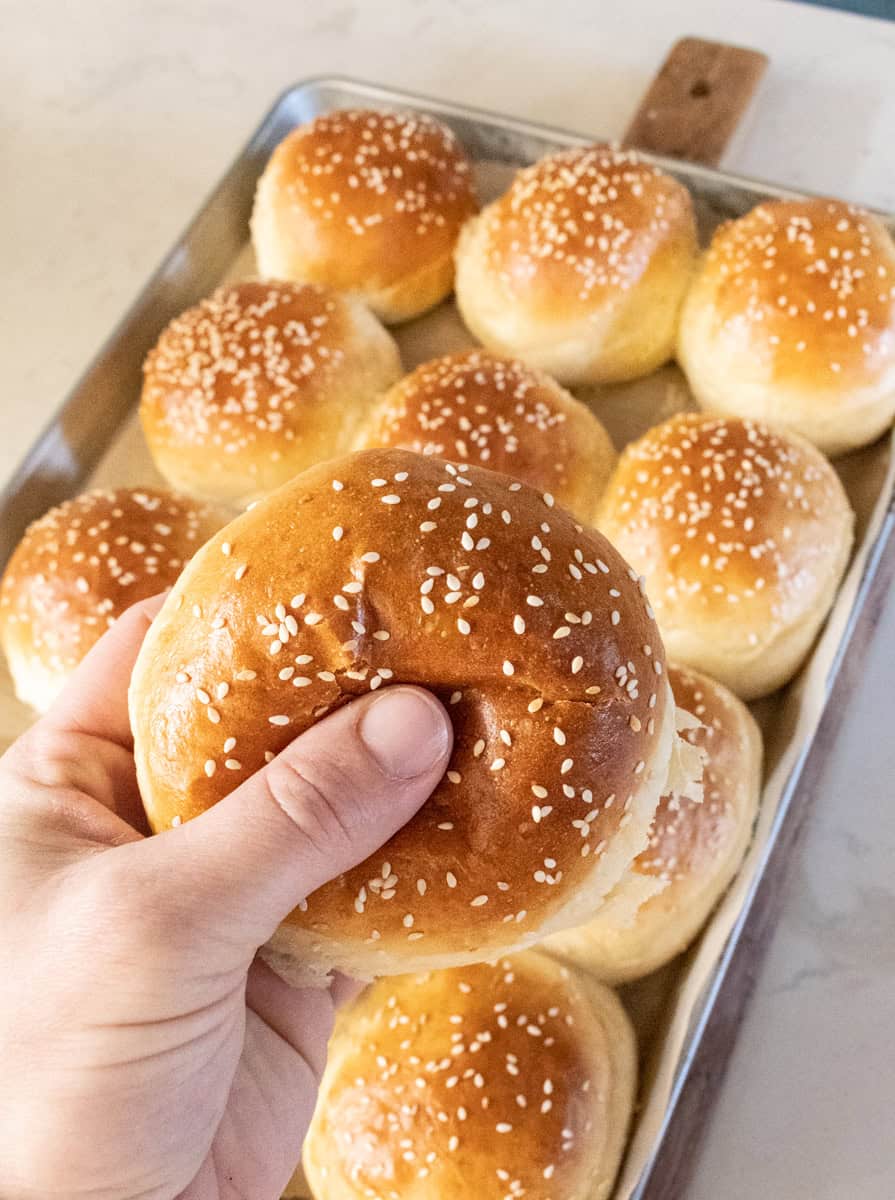

Store-bought burger buns often feel dense and bland, breaking apart at first bite. Making your own burger buns at home is easier than you’d think, and the difference in texture and flavor is remarkable. With just basic pantry ingredients and a few hours of hands-off rising time, you’ll have bakery-quality buns that elevate any burger night from ordinary to memorable.
How to Make Super Soft Homemade Burger Buns
This recipe produces 8-10 tender, golden buns with a soft crumb and sturdy structure that holds up to toppings without falling apart.
Ingredients
- 3 1/2 cups all-purpose flour
- 1 tablespoon instant yeast
- 1 cup warm milk (110°F)
- 4 tablespoons unsalted butter, melted
- 2 large eggs, divided
- 1 1/2 teaspoons salt
- 2 tablespoons granulated sugar
Method
Combine wet ingredients and activate yeast
Pour warm milk into a large mixing bowl and add the melted butter, one egg, sugar, and yeast. Stir gently and let sit for 5 minutes until the mixture becomes foamy, indicating the yeast is alive and active.
Mix dough until shaggy
Add flour and salt to the wet mixture. Stir with a wooden spoon or dough hook until a shaggy, rough dough forms. The mixture should be slightly sticky but hold together.
Knead until smooth and elastic
Transfer the dough to a lightly floured work surface and knead for 8-10 minutes by hand, or use a stand mixer on medium speed for 6-7 minutes. The dough should become smooth, elastic, and spring back when poked. It should feel slightly sticky but not wet.
First rise in a warm place
Lightly oil a large bowl and place the kneaded dough inside, turning to coat all sides. Cover with a damp cloth and let rise in a warm, draft-free spot for 1 to 1.5 hours until the dough doubles in size.
Shape into buns and arrange on baking sheet
Punch down the risen dough and divide into 8-10 equal pieces. Roll each piece into a smooth ball between your palms, then gently flatten slightly. Place on parchment-lined baking sheets, spacing them about 2 inches apart.
Second rise until puffy
Cover the shaped buns loosely with plastic wrap or a damp towel. Let them rise for 45 minutes to 1 hour in a warm spot until they’re noticeably puffy and nearly doubled in height.
Brush with egg wash and add toppings
Preheat your oven to 375°F. Beat the remaining egg with 1 tablespoon of water. Brush the top of each bun generously with this egg wash, then sprinkle with sesame seeds or poppy seeds if desired.
Bake until golden brown
Bake for 18-22 minutes until the buns are deep golden brown on top. Transfer to a cooling rack immediately. The buns will be hot and steaming–let them cool for at least 10 minutes before slicing to allow the crumb to set.
- Milk temperature is critical: use an instant-read thermometer to ensure it’s between 105-110°F. Too hot and you’ll kill the yeast; too cool and fermentation won’t start properly.
- For a softer crumb, brush the warm buns with melted butter immediately after removing them from the oven, then cover loosely with a clean kitchen towel for 5 minutes to trap steam.
- Buns freeze beautifully for up to 3 months. Wrap cooled buns individually in plastic wrap, then place in a freezer bag. Thaw at room temperature or toast from frozen for 2-3 minutes.
What to Look For in Burger Bun Baking Equipment
- Stand mixer capacity and power: A stand mixer with at least a 5-quart bowl and 500+ watts of power will handle bread dough efficiently without strain. Look for a machine with a dough hook attachment that can knead for extended periods without overheating.
- Instant-read thermometer accuracy: Choose a thermometer with a quick response time (3 seconds or less) and a range covering 32-212°F. Digital displays with a narrow probe (1/16 inch) allow precise milk temperature checks without damaging delicate dough.
- Baking sheet material and size: Heavy-gauge aluminum or steel sheets (at least 16 gauge) distribute heat evenly and resist warping. A half-sheet size (13×18 inches) fits a full batch of 8-10 buns comfortably with adequate spacing.
- Parchment paper quality and coverage: High-quality parchment withstands temperatures up to 420°F and provides reliable non-stick coverage without curling or sticking. Precut sheets for standard baking pans save time and reduce waste during the baking process.
KitchenAid Artisan 5-Quart Stand Mixer
Best for: Home bakers making dough regularly
The KitchenAid Artisan is a workhorse for any home baker. Its powerful motor handles burger bun dough effortlessly, while the 5-quart stainless steel bowl accommodates full batches. The flat mixing paddle, dough hook, and wire whip give you three options for different dough types. Built to last decades, this mixer pays dividends across countless baking projects.
Check Current Price on Amazon →Hamilton Beach 4-Quart Stand Mixer
Best for: Budget-conscious home bakers
The Hamilton Beach stand mixer offers excellent value for occasional bakers. Its 4-quart capacity handles burger bun dough with ease, and the 300-watt motor provides reliable mixing power. While not as durable as premium brands, it includes a dough hook, flat beater, and whip, making it versatile enough for most home baking needs without breaking the bank.
Check Current Price on Amazon →ThermoPro Instant-Read Digital Thermometer
Best for: First-time bread bakers
Getting milk temperature right is essential for successful bread baking, and this ThermoPro thermometer delivers in 3 seconds with high accuracy. The large digital display is easy to read, and the thin probe won’t damage your dough. Its waterproof design and auto-shutoff make it foolproof and durable for years of use.
Check Current Price on Amazon →All-Clad Half Sheet Baking Pan
Best for: Serious home bakers
All-Clad’s heavy-gauge aluminum construction ensures perfectly even browning of your burger buns every single time. The commercial-quality build resists warping even under repeated high-heat use, and the rolled edges prevent sharp corners. This is a lifetime investment that professional bakers trust.
Check Current Price on Amazon →Start Baking Better Burgers Tonight
Homemade burger buns transform your backyard cookout from casual to memorable. The process is genuinely manageable–most of the time is passive rising while you work on other things. Once you taste the difference between a soft, buttery homemade bun and a generic supermarket version, you’ll never go back. Your family will notice immediately, and you’ll find yourself baking them regularly for sandwiches, sliders, and dinner rolls.
Invest in a quality stand mixer and a reliable thermometer, and you’ve set yourself up for success not just with burger buns, but with any bread project. These tools pay dividends across years of baking, becoming some of the most-used items in your kitchen. Your first batch might not be perfect, but they’ll still taste better than store-bought–and by your third or fourth attempt, you’ll be consistently producing bakery-quality results that earn genuine praise.
Frequently Asked Questions
Can I make these burger buns with whole wheat flour?
Yes, but replace no more than 25-30% of the all-purpose flour with whole wheat flour to maintain the soft texture. Whole wheat absorbs more moisture, so you may need to add 1-2 tablespoons of additional milk. The result will be denser but still delicious and more nutritious.
What if my dough doesn’t rise properly?
Yeast activity depends heavily on temperature and ingredient freshness. Ensure your yeast hasn’t expired, use warm (not hot) milk, and place dough in a consistently warm spot like inside an off oven with the light on. Cold kitchens may require 2-3 hours of rising time instead of 1.5 hours.
How do I store leftover burger buns?
Store cooled buns in an airtight container at room temperature for up to 3 days. For longer storage, wrap individually in plastic wrap and freeze for up to 3 months. Thaw at room temperature for 2-3 hours or toast from frozen for 2-3 minutes for a freshly-baked taste.
Why are my buns dense and heavy instead of fluffy?
This usually results from under-kneading, insufficient rising time, or old yeast. Ensure you knead long enough for the dough to become smooth and elastic, allow full rising time in a warm spot, and always check your yeast expiration date before using.
Can I use active dry yeast instead of instant yeast?
Yes, but use slightly more–about 1.25 tablespoons active dry yeast instead of 1 tablespoon instant. Active dry yeast granules are larger and less concentrated than instant yeast, so you need a bit extra to achieve the same fermentation speed.
As an Amazon Associate, Build & Bloom earns from qualifying purchases. We only recommend products we genuinely think are useful. Prices and availability vary; check Amazon for the latest.
Leave a Reply